In this tutorial, we are going to create a sample application on the recommended MVVM Architecture Pattern and you will notice how it improves overall code quality, maintenance and debugging of our app.
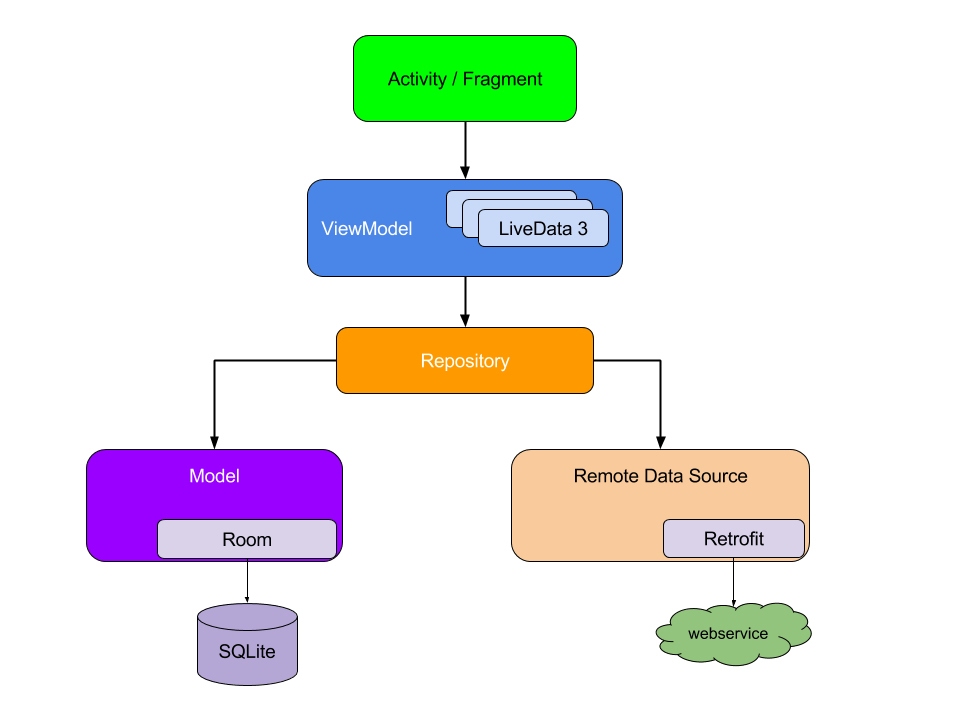
The above figure shows the MVVM design pattern. Android App Development Company India will build all these components step by step and notice the dependency of one component on the other. Check the docs to know more about the design pattern. As you can see the UI components are kept away from the business logic of app. The activity will use the ViewModel to get the data where the ViewModel will use the Repository to get the data which contains data from different data sources.
Our app will query to the Food2Fork API using a SearchView and display the corresponding recipes in a RecyclerView. So head there and generate an API Key.
Start by creating a new Android Studio project name it anything of your choice.
Adding the Dependencies
Add the following dependencies to your build.gradle file -
implementation 'androidx.recyclerview:recyclerview:1.0.0'
implementation "com.squareup.retrofit2:retrofit:$retrofitVersion"
implementation "com.squareup.retrofit2:converter-gson:$retrofitVersion"
// ViewModel and LiveData
implementation "androidx.lifecycle:lifecycle-extensions:2.1.0-alpha02"
implementation "androidx.cardview:cardview:1.0.0"
implementation 'com.google.android.material:material:1.0.0'
implementation "com.github.bumptech.glide:glide:$glideVersion"
annotationProcessor "com.github.bumptech.glide:compiler:$glideVersion"
(Check the latest version from the respective official docs.)
Note here we have added the ViewModel and LiveData dependencies.
Adding Internet Permission
Add the required INTERNET permission in the Manifest.xml so we can make network calls.
<uses-permission android:name="android.permission.INTERNET" />
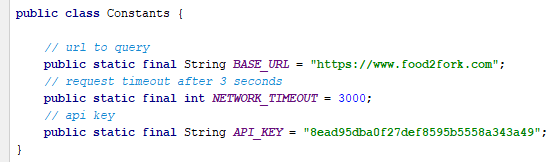
Now, create a package called utils and add a new ConstantsM class in it.
This class is consists of our URL, API key and a network timeout of 3 seconds.
Next, create a new package network which will hold all of our network logic. Inside this, we will add three classes. First one is an interface RecipeApi -
public interface RecipeApi {
@GET("api/search")
Call
<FoodResponse>
searchRecipe(
@Query("key") String key,
@Query("q") String query,
@Query("page") String page
);
}
</FoodResponse>
We create a method searchRecipe which returns a Retrofit Call object. The @GET annotation denotes what kind of HTTP request we are going to make.
Now create a class named ServiceGenerator which acts as a controller for our Api Client -
public class ServiceGenerator {
private static Retrofit.Builder retrofitBuilder =
new Retrofit.Builder()
.baseUrl(Constants.BASE_URL).addConverterFactory(GsonConverterFactory.create());
private static Retrofit retrofit = retrofitBuilder.build();
private static RecipeApi recipeApi = retrofit.create(RecipeApi.class);
public static RecipeApi getRecipeApi() {
return recipeApi;
}
}
We add the Food2Fork API’s URL that we instantiated in Constants class. In the addConverterFactory() method, we add the GsonConverterFactory for serialization and deserialization of objects and then pass all these to our Retrofit instance.
The third class is our ApiClient so create it and leave it blank for now.
Model JSON Response
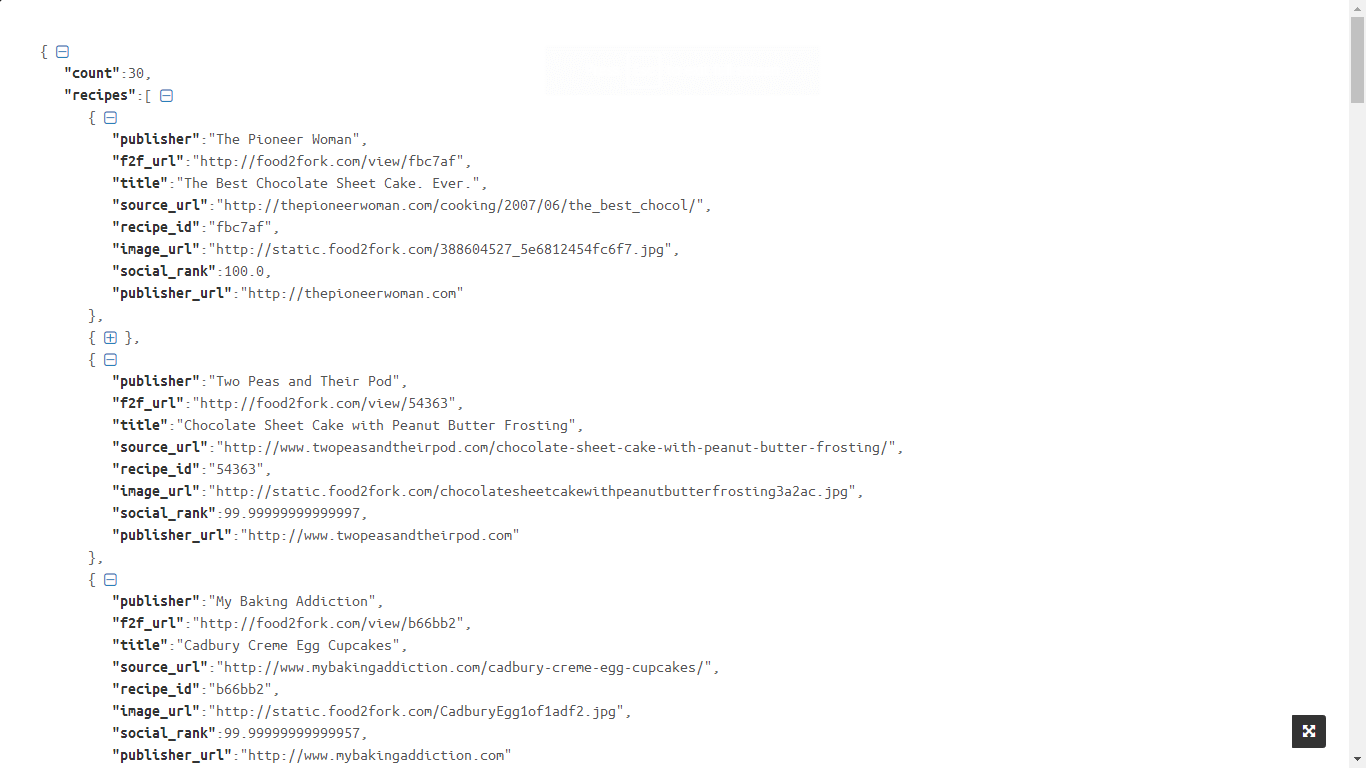
Let’s now take a look at the JSON response we are going to parse. You can check the Food2Fork docs for a sample response. Our URL, in this case, is
https://www.food2fork.com/api/search?key=YOUR_API_KEY&q=cake&page=1
The response you get is -
So now we will model this JSON Resopnse. So, we will create a new package called model, and we will add two classes here -
-
FoodResponse
public class FoodResponse {
@SerializedName("recipes")
@Expose
private List
<Recipe>
recipes;
public List
<Recipe>
getRecipes() {
return recipes;
}
}
</Recipe>
</Recipe>
-
Recipe -
This is a simple data class reflecting the JSON
public class Recipe{
private String title, publisher, image_url;
public Recipe(String title, String publisher, String image_url) {
this.title = title;
this.publisher = publisher;
this.image_url = image_url;
}
public Recipe() {
}
public String getTitle() {
return title;
}
public String getPublisher() {
return publisher;
}
public String getImage_url() {
return image_url;
}
}
Now we will create an Executor Class. So, create a new class called AppExecutors -
public class AppExecutors {
private static AppExecutors instance;
public static AppExecutors get(){
if(instance == null){
instance = new AppExecutors();
}
return instance;
}
private final ScheduledExecutorService mNetworkIO =
Executors.newScheduledThreadPool(3);
public ScheduledExecutorService networkIO() {
return mNetworkIO;
}
}
This class will fire the background threads when we need them, as all of the Retrofit requests need to be done on the background thread. The class uses the Singleton pattern, which is a software design pattern that restricts instantiation of a class/object to a single one. We are using the ScheduledExecutorService as it allows extra functionalities compared to the classic Executor, and can run after a time delay. Then we create a pool of thread, 3 threads to do all the work required in the app. Later we will use this networkIO object to set a timeout.
We will use the schedule() method of ScheduledExecutorService to set a network timeout and can cancel the request.
Now let’s head back to our ApiClient class. Later our repository will observe this data source and send it to the ViewModel.
public class ApiClient {
private static ApiClient instance;
private MutableLiveData<List
<Recipe>
> mRecipes;
private RetrieveRecipesRunnable mRetrieveRecipesRunnable;
public static ApiClient getInstance(){
if(instance == null){
instance = new ApiClient();
}
return instance;
}
private ApiClient() {
mRecipes = new MutableLiveData<>();
}
public LiveData<List
<Recipe>
> getRecipes(){
return mRecipes;
}
public void searchRecipesApi(String query, int pageNumber){
if(mRetrieveRecipesRunnable != null){
mRetrieveRecipesRunnable = null;
}
mRetrieveRecipesRunnable = new RetrieveRecipesRunnable(query, pageNumber);
final Future handler = AppExecutors.getInstance().networkIO().submit(mRetrieveRecipesRunnable);
// Set a timeout for the data refresh
AppExecutors.getInstance().networkIO().schedule(new Runnable() {
@Override
public void run() {
// let the user know it timed out
handler.cancel(true);
}
}, NETWORK_TIMEOUT, TimeUnit.MILLISECONDS);
}
private class RetrieveRecipesRunnable implements Runnable{
private String query;
private int pageNumber;
private boolean cancelRequest;
private RetrieveRecipesRunnable(String query, int pageNumber) {
this.query = query;
this.pageNumber = pageNumber;
cancelRequest = false;
}
@Override
public void run() {
try {
Response response = getRecipes(query, pageNumber).execute();
if(cancelRequest){
return;
}
if(response.code() == 200){
List
<Recipe>
list = new ArrayList<>(((FoodResponse)response.body()).getRecipes());
Log.d("URL", "run: " + response.raw().request().url());
if(pageNumber == 1){
mRecipes.postValue(list);
}
else{
List
<Recipe>
currentRecipes = mRecipes.getValue();
currentRecipes.addAll(list);
mRecipes.postValue(currentRecipes);
}
}
else{
mRecipes.postValue(null);
}
} catch (Exception e) {
e.printStackTrace();
mRecipes.postValue(null);
}
}
private Call
<FoodResponse>
getRecipes(String query, int pageNumber){
return ServiceGenerator.getRecipeApi().searchRecipe(
API_KEY,
query,
String.valueOf(pageNumber));
}
}
}
This is a lot of code, so let’s understand it. This class is also built on the Singleton pattern. Next, we instantiate a MutableLiveData object in the constructor, and have an associated getter method.
Let’s talk about LiveData a bit. LiveData follows the Observer pattern and this Observer is notified whenever lifecycle changes.This leads to a clean code structure as whenever your data updates it is reflected in the UI. Moreover when an activity is destroyed the observer associated with it gets destroyed too, preventing memory leaks.You also don’t need to explicitly configure lifecycle events as while observing LiveData is aware of lifecycle events, example you don’t need to manage the configure changes!
Also MutableLiveData is just a subclass of LiveData and its value can be changed contrast to the LiveData, and LiveData can only be observed.
Now since we are going to make request in the ApiClient, we make new method searchRecipesApi. Inside this we create a Future object which is going to make the call and set a timeout as well. In the submit method we pass our own Runnable class implementation inside of which we are calling Retrofit’s execute() method, and posting the response to our LiveData object. Also inside of our searchRecipesApi method we call schedule() method which takes three parameters, viz, a Runnable, time duration and the Time Unit. Inside this we cancel our Future object denothing the request timeout.
Next create a new package called as repositories and add class RecipeRepository to it -
public class RecipeRepository {
private static RecipeRepository instance;
private ApiClient mApiClient;
private String mQuery;
private int mPageNumber;
public static RecipeRepository getInstance(){
if(instance == null){
instance = new RecipeRepository();
}
return instance;
}
private RecipeRepository() {
mApiClient = ApiClient.getInstance();
}
public LiveData<List
<Recipe>
> getRecipes(){
return mApiClient.getRecipes();
}
public void searchRecipesApi(String query, int pageNumber){
if(pageNumber == 0){
pageNumber = 1;
}
mQuery = query;
mPageNumber = pageNumber;
mApiClient.searchRecipesApi(query, pageNumber);
}
public void searchNextPage(){
searchRecipesApi(mQuery,mPageNumber+1);
}
}
It is also based on singleton pattern and as seen in the diagram further takes our LiveData away from the view, as shown in the MVVM diagram above. Acting as an intermediary between the ViewModel and the data source. So the implementation here is pretty straightforward and we create an ApiClient object and then we search recipes by calling the searchRecipesApi method of our ApiClient.
Now before jumping on anything else, let’s take a second to create the layouts for our app. So, create a new Layout resource file layout_recipe_list_item -
<?xml version="1.0" encoding="utf-8" ?>
<LinearLayout xmlns:android="http://schemas.android.com/apk/res/android"
android:layout_width="match_parent"
android:layout_height="wrap_content"
xmlns:app="http://schemas.android.com/apk/res-auto"
xmlns:tools="http://schemas.android.com/tools"
android:orientation="vertical">
<androidx.cardview.widget.CardView android:layout_width="match_parent"
android:layout_height="wrap_content"
android:id="@+id/card_view"
app:cardElevation="10dp">
<LinearLayout android:layout_width="match_parent"
android:layout_height="wrap_content"
android:orientation="vertical">
<ImageView android:layout_width="match_parent"
android:layout_height="@dimen/recipe_image_height"
android:scaleType="centerCrop"
android:id="@+id/recipe_thumbnail"
tools:src="@tools:sample/avatars" />
<LinearLayout android:layout_width="match_parent"
android:layout_height="wrap_content"
android:orientation="vertical"
android:padding="10dp">
<TextView android:layout_width="wrap_content"
android:layout_height="wrap_content"
android:textSize="@dimen/recipe_title_text_size"
android:textColor="#000"
android:id="@+id/tv_recipe_title" />
<LinearLayout android:layout_width="match_parent"
android:layout_height="wrap_content"
android:orientation="horizontal"
android:weightSum="100">
<TextView android:layout_width="0dp"
android:layout_height="wrap_content"
android:layout_weight="90"
android:textSize="@dimen/recipe_publisher_text_size"
android:id="@+id/recipe_publisher"
android:gravity="start" />
</LinearLayout>
</LinearLayout>
</LinearLayout>
</androidx.cardview.widget.CardView>
</LinearLayout>
The layout tells what each item inside of our RecyclerView should be displayed as. We have refactored the absolute sizes in a dimens xml file which contains following attributes -
<dimen name="recipe_image_height">250dp</dimen>
<dimen name="recipe_title_text_size">20sp</dimen>
<dimen name="recipe_publisher_text_size">16sp</dimen>
<dimen name="recycler_loading_view_height">80dp</dimen>
In the layout of MainActivity we will add a RecyclerVew and a SearchView, using CoordinatorLayout as parent. Also set App theme as Theme.AppCompat.Light.NoActionBar in res/styles.xml.
<?xml version="1.0" encoding="utf-8" ?>
<androidx.coordinatorlayout.widget.CoordinatorLayout xmlns:android="http://schemas.android.com/apk/res/android"
xmlns:app="http://schemas.android.com/apk/res-auto"
xmlns:tools="http://schemas.android.com/tools"
android:layout_width="match_parent"
android:layout_height="match_parent"
tools:context=".MainActivity">
<com.google.android.material.appbar.AppBarLayout android:layout_width="match_parent"
android:layout_height="wrap_content">
<androidx.appcompat.widget.Toolbar android:id="@+id/toolbar"
app:layout_scrollFlags="scroll|enterAlways"
android:layout_width="match_parent"
android:layout_height="wrap_content">
<androidx.appcompat.widget.SearchView android:id="@+id/search_view"
android:layout_width="match_parent"
app:queryHint="chicken ..."
android:layout_height="?attr/actionBarSize" />
</androidx.appcompat.widget.Toolbar>
</com.google.android.material.appbar.AppBarLayout>
<androidx.recyclerview.widget.RecyclerView android:id="@+id/recipe_list"
android:layout_width="match_parent"
android:layout_height="match_parent"
app:layout_behavior="@string/appbar_scrolling_view_behavior" />
</androidx.coordinatorlayout.widget.CoordinatorLayout>
Now create a new package called adapter, and as you might have guessed it will have logic have a viewholder and a RecyclerViewAdapter. Create a new class CustomAdapter -
public class CustomAdapter extends RecyclerView.Adapter
<RecyclerView.ViewHolder>
{
private List
<Recipe>
mRecipes;
public CustomAdapter() {
}
@NonNull
@Override
public RecyclerView.ViewHolder onCreateViewHolder(@NonNull ViewGroup viewGroup, int i) {
View view = LayoutInflater.from(viewGroup.getContext()).inflate(R.layout.layout_recipe_list_tiem,
viewGroup, false);
return new CustomViewHolder(view);
}
@Override
public void onBindViewHolder(@NonNull RecyclerView.ViewHolder viewHolder, int i) {
RequestOptions requestOptions = new RequestOptions()
.placeholder(R.drawable.ic_launcher_background);
Glide.with(viewHolder.itemView.getContext())
.setDefaultRequestOptions(requestOptions)
.load(mRecipes.get(i).getImage_url())
.into(((CustomViewHolder)viewHolder).imageView);
((CustomViewHolder)viewHolder).title.setText(mRecipes.get(i).getTitle());
((CustomViewHolder)viewHolder).publisher.setText(mRecipes.get(i).getPublisher());
}
@Override
public int getItemCount() {
if (mRecipes != null){
return mRecipes.size();
}
return 0;
}
public void setRecipes(List
<Recipe>
recipes){
mRecipes = recipes;
notifyDataSetChanged();
}
public class CustomViewHolder extends RecyclerView.ViewHolder {
TextView title;
TextView publisher;
ImageView imageView;
public CustomViewHolder(@NonNull View itemView) {
super(itemView);
title = itemView.findViewById(R.id.tv_recipe_title);
publisher = itemView.findViewById(R.id.recipe_publisher);
imageView = itemView.findViewById(R.id.recipe_thumbnail);
}
}
}
</Recipe>
</Recipe>
</RecyclerView.ViewHolder>
The CustomViewHolder inner class contains the views which are needed to be bind to the adapter. We also use Glide library to load the image into our image view and if you have been developing apps this would be very familiar to you.
Now create a new package viewmodel and inside of it create a new class MainActivityViewModel -
public class MainActivityViewModel extends ViewModel {
private RecipeRepository mRecipeRepository;
private boolean mIsQueryingRecipes;
private Boolean mIsViewingRecipes;
public MainActivityViewModel() {
mIsViewingRecipes = false;
mRecipeRepository = RecipeRepository.getInstance();
mIsQueryingRecipes = false;
}
public LiveData<List
<Recipe>
> getRecipes() {
return mRecipeRepository.getRecipes();
}
public Boolean IsViewingRecipes() {
return mIsViewingRecipes;
}
public void setIsQueryingRecipes(boolean mIsQueryingRecipes) {
this.mIsQueryingRecipes = mIsQueryingRecipes;
}
public void searchRecipesApi(String query, int pageNumber){
mIsViewingRecipes = true;
mRecipeRepository.searchRecipesApi(query, pageNumber);
mIsQueryingRecipes = true;
}
public void searchNextPage(){
if (!mIsQueryingRecipes && mIsViewingRecipes){
mRecipeRepository.searchNextPage();
}
}
}
The ViewModel class is responsible for passing the data to our Activity from the Repository. Main function of this class is to avoid the loss of data on configuration changes. We extend the ViewModel class and create an instance variable of repository class, and use it to get the data.
You can also use member variables like mIsQueryingRecipes and mIsViewingRecipes to know if the actions on the UI which is a great way for architecturing your app.
Now we are ready to go to our MainActivity and implement this ViewModel. In our activity we get the viewmodel from the framework utility class called ViewModelProviders which takes an activity instance.
Next we use our ViewModel object to call the getRecipes method which returns a LiveData and observe this LiveData and pass a context and Observer as argument. So, we will use its onChanged() method which triggers when a change is made to our LiveData object.
Here is the implementation -
public class MainActivity extends AppCompatActivity{
private MainActivityViewModel mMainActivityViewModel;
private RecyclerView mRecyclerView;
private CustomAdapter mAdapter;
private SearchView mSearchView;
@Override
protected void onCreate(Bundle savedInstanceState) {
super.onCreate(savedInstanceState);
setContentView(R.layout.activity_main);
mRecyclerView = findViewById(R.id.recipe_list);
mSearchView = findViewById(R.id.search_view);
mMainActivityViewModel = ViewModelProviders.of(this).get(MainActivityViewModel.class);
initRecyclerView();
subscribeObservers();
initSearchView();
setSupportActionBar((Toolbar) findViewById(R.id.toolbar));
}
private void subscribeObservers(){
mMainActivityViewModel.getRecipes().observe(this, new Observer<List
<Recipe>
>() {
@Override
public void onChanged(@Nullable List
<Recipe>
recipes) {
if(recipes != null){
if(mMainActivityViewModel.IsViewingRecipes()) {
mAdapter.setRecipes(recipes);
mMainActivityViewModel.setIsQueryingRecipes(false);
}
}
}
});
}
private void initRecyclerView(){
mAdapter = new CustomAdapter();
mRecyclerView.setAdapter(mAdapter);
mRecyclerView.setLayoutManager(new LinearLayoutManager(this));
mRecyclerView.addOnScrollListener(new RecyclerView.OnScrollListener() {
@Override
public void onScrollStateChanged(@NonNull RecyclerView recyclerView, int newState) {
if(!mRecyclerView.canScrollVertically(1)){
mMainActivityViewModel.searchNextPage();
}
super.onScrollStateChanged(recyclerView, newState);
}
});
}
private void initSearchView(){
mSearchView.setOnQueryTextListener(new SearchView.OnQueryTextListener() {
@Override
public boolean onQueryTextSubmit(String query) {
mMainActivityViewModel.searchRecipesApi(query,1);
mSearchView.clearFocus();
return false;
}
@Override
public boolean onQueryTextChange(String newText) {
return false;
}
});
}
}
Note how we are using search view to query the data. Run the app and enter a query, example `Cake`, and you should see a list of Cake recipes and can match it from the Food2Fork API. But here is a catch. If you run the app on API level 28, Glide won’t be able to load images. This is as network security configuration options have changed and you can’t simply load resources from HTTP requests though HTTPS would work fine.
So, create a new directory xml inside the res folder. Now create a new Network configuration file network_security_config.xml -
<?xml version="1.0" encoding="utf-8" ?>
<network-security-config>
<domain-config cleartextTrafficPermitted="true">
<domain includeSubdomains="true">static.food2fork.com</domain>
</domain-config>
</network-security-config>
After this go to Manifest and reference this file by adding the tag and run app again -
android:networkSecurityConfig="@xml/network_security_config"
You have successfully implemented MVVM architecture