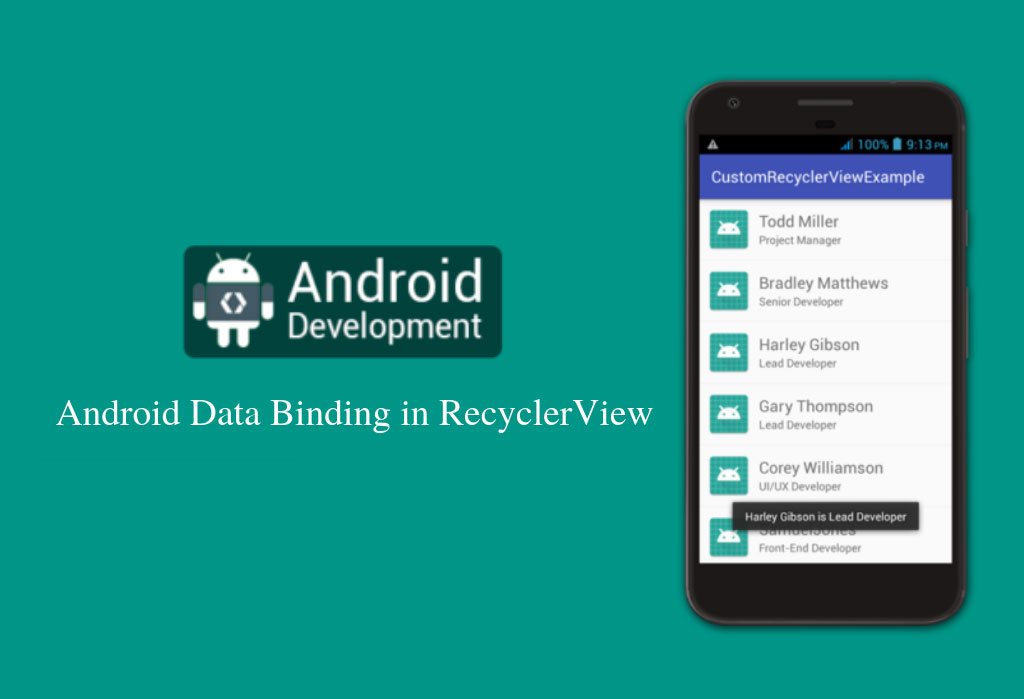
Databinding in android give you the easiest and much powerful way to connect UI elements of your application’s layout with business logic by using declarative layouts which minimizes your effortsof writing code and update the layouts programmatically without manual interference. It also integrates Java/Kotlin code with xml layouts and taking good care of views and keep them upgraded without any interruption.Not only this, it also raise your app’s performance and making it more flexible by preventing it from crashing.
Connecting the components of layout files with data objects helps you avoiding many UI framework calls in your activities and make them simplify and easier to maintain. Android databinding support library is used to support this feature which is compatible with all the latest android versions and creates thebinding classes that are required to tie layout’s views with your data objects.
Project Setup
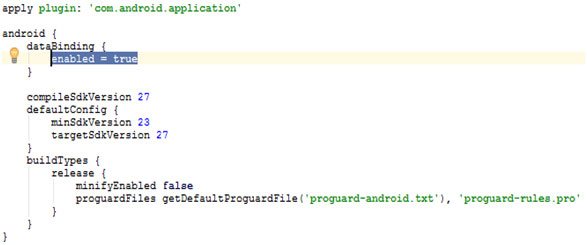
To implement a databinding in your application you first need to enable this feature in app/build.gradle file of your project and a layout files in which you want to use.
EnabeDatabinding in app/build.gradle
In build.gradle file of your project under app, enable the databinding by adding the following code snippet and sync the project.
Build.gradle
EnableBindingin a layout File
You have to make some changes in a layout files in which you want to enable databinding. Databinding layouts are slightly different and start the layout file with the <layout> root tag proceeding by a data element and a view root elements.The data element will be used to represent the data which is ready to use for binding and the view element represents the root hierarchy which would be in the layout files other than binding layouts. See the below example in which data model object variable is defined under <data>tag using variable element.
Binding Expressions
Binding expressions are actually used in expression language to write the expressions that allows variables to make connection with the views in the layout files.
The @{} symbol in theassignment expressions is used to make connections between attribute of views and the property of data model object. Generally, we use setText() methods to set data in a textView but instead of using this method and calling it manually for each property we are assigning text to a widgets directly in a layout file.
Observable data objects
Android data binding support library remove all your worries by providing classes and methods which will automatically detects if any changes occurs in data source and allowing you to handle them by making the variables or their properties observable. You can make your fields, objects or collection observable with the help of this library.
Binding classes
The data binding library auto generatesbinding classes on the bases ofeach binding layout file and grasp all the bindings from the layout properties. By default, the name of the binding class will be set according to the name of the layout file and convert it into the pascal case by adding the Binding suffix at the end of the class name. Here, Android app development India are explain an example, if the layout file name is activity_main.xml then the binding class name will be ActivityMainBinding.
Implementation
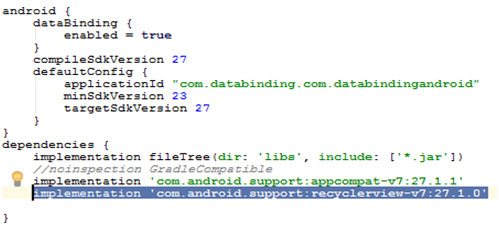
In this tutorial I am going to display phone contacts list by implementing data binding using recycler view. For recycler view, you must need to add the following dependency in your build.gradle file of your project under appmodule.
Build.gradle
Adding resource to your project:
dimens.xml
<resources>
<!-- Default screen margins, per the Android Design guidelines. -->
<dimenname ="activity_horizontal_margin">
16dp
</dimen>
<dimenname ="activity_vertical_margin">
16dp
</dimen>
<dimenname ="row_padding_vertical">
10dp
</dimen>
</dimenname>
</dimenname>
</dimenname>
</resources>
styles.xml
<resources>
<!-- Base application theme. -->
<style name="AppBaseTheme" parent="Theme.AppCompat.Light.DarkActionBar">
<!-- Customize your theme here. -->
<item name="colorPrimary">@color/colorPrimary</item>
<item name="colorPrimaryDark">@color/colorPrimaryDark</item>
<item name="colorAccent">@color/colorAccent</item>
</style>
</resources>
colors.xml
<?xml version="1.0" encoding="utf-8" ?>
<resources>
<color name="colorPrimary">#3F51B5</color>
<color name="colorPrimaryDark">#303F9F</color>
<color name="colorAccent">#FF4081</color>
</resources>
activity_main.xml
<?xml version="1.0" encoding="utf-8" ?>
<android.support.constraint.ConstraintLayoutxmlns:android ="http://schemas.android.com/apk/res/android"
xmlns:app="http://schemas.android.com/apk/res-auto"
xmlns:tools="http://schemas.android.com/tools"
android:layout_width="match_parent"
android:layout_height="match_parent"
tools:context=".MainActivity">
<android.support.v7.widget.RecyclerView android:id="@+id/recycler_view"
android:layout_width="match_parent"
android:layout_height="match_parent" />
</android.support.constraint.ConstraintLayout>
</android.support.constraint.ConstraintLayoutxmlns:android>
Binding Views element with data model objects
- Represents a single row item in a recycler view.Add the below code in contacts_row_item.xml file.
- @{contacts.name},@{contacts.name}are the view properties in textView that are used to make the connection with data objects in Contacts.java class and @{contacts.getImageUrl()} is used to bind ImageView property with the method in Contacts.java file.
contacts_row_item.xml
<?xml version="1.0" encoding="utf-8" ?>
<layout xmlns:bind="http://schemas.android.com/apk/res/android">
<data>
<variable name="contacts"
type="com.databinding.com.databindingandroid.model.Contacts" />
</data>
<RelativeLayoutxmlns:android ="http://schemas.android.com/apk/res/android"
xmlns:app="http://schemas.android.com/apk/res-auto"
android:layout_width="match_parent"
android:layout_height="wrap_content"
android:background="?android:attr/selectableItemBackground"
android:clickable="true"
android:focusable="true"
android:orientation="vertical"
android:paddingBottom="@dimen/row_padding_vertical"
android:paddingLeft="@dimen/activity_horizontal_margin"
android:paddingRight="@dimen/activity_horizontal_margin"
android:paddingTop="@dimen/row_padding_vertical">
<TextView android:id="@+id/name"
android:layout_width="wrap_content"
android:layout_height="wrap_content"
android:layout_alignParentTop="true"
android:textColor="@color/colorPrimaryDark"
android:text="@{contacts.name}"
android:layout_marginTop="10dp"
android:textSize="16dp"
android:textStyle="bold" />
<TextView android:id="@+id/number"
android:layout_width="wrap_content"
android:layout_height="wrap_content"
android:text="@{contacts.phone}"
android:layout_below="@id/name" />
<ImageView android:id="@+id/imageView"
android:layout_width="20dp"
android:layout_height="20dp"
android:layout_alignParentEnd="true"
android:layout_alignParentTop="true"
android:layout_marginEnd="20dp"
android:layout_marginTop="10dp"
android:src="@{contacts.getImageUrl()}" />
</RelativeLayout>
</RelativeLayoutxmlns:android>
</layout>
Create a java class Contacts.java which is data object model class inside a package name model and add the below code snippet in it. This class has three properties that are binded to the views of the layout file contacts_row_item.xml.
Contacts.java
package com.databinding.com.databindingandroid.model;
import com.databinding.com.databindingandroid.BR;
public class Contacts {
String name;
String phone;
private intimageUrl;
public Contacts(String name,Stringphone,intimageUrl) {
this.name = name;
this.phone= phone;
this.imageUrl= imageUrl;
}
public String getName() {
return name;
}
public String getPhone() {
return phone;
}
public intgetImageUrl() {
return imageUrl;
}
}
Create a CustomImageBinding.java class and use BindAdapters to bind the data object with the image view in thelayout file using @BindingAdapter({"android:src"})
CustomImageAdapter.java
package com.databinding.com.databindingandroid;
import android.databinding.BindingAdapter;
import android.widget.ImageView;
public class CustomImageBinding {
@BindingAdapter({"android:src"})
public static void setImageViewResource(ImageViewimageView,intresource){
imageView.setImageResource(resource);
}
}
Bind the layout view of the contacts_row_item.xml file with binder object and get access to it.
ContactsViewHolder.java
package com.databinding.com.databindingandroid;
import android.databinding.DataBindingUtil;
import android.databinding.ViewDataBinding;
import android.support.v7.widget.RecyclerView;
import android.view.View;
public class ContactsViewHolderextends RecyclerView.ViewHolder {
private ViewDataBindingbindings;
public ContactsViewHolder(View itemView) {
super(itemView);
bindings= DataBindingUtil.bind(itemView);
}
public ViewDataBindinggetBindings(){
return bindings;
}
}
Create an adapter class ContactsAdapter.java and add the below code snippet.
ContactsAdapter.java
package com.databinding.com.databindingandroid;
import android.content.Context;
import android.support.annotation.NonNull;
import android.support.v7.widget.RecyclerView;
import android.view.LayoutInflater;
import android.view.View;
import android.view.ViewGroup;
import com.databinding.com.databindingandroid.model.Contacts;
import java.util.List;
public class ContactsAdapterextends RecyclerView.Adapter
<ContactsViewHolder>
{
private Context context;
private List
<Contacts>
phoneContacts;
public ContactsAdapter(Context context, List
<Contacts>
phoneContacts) {
this.context=context;
this.phoneContacts=phoneContacts;
}
@NonNull
@Override
public ContactsViewHolderonCreateViewHolder(@NonNullViewGroup parent, intviewType) {
View myView= LayoutInflater.from(context).inflate(R.layout.contacts_row_item,parent,false);
return new ContactsViewHolder(myView);
}
@Override
public void onBindViewHolder(@NonNullContactsViewHolder holder, intposition) {
final Contacts contactsObject=phoneContacts.get(position);
holder.getBindings().setVariable(com.databinding.com.databindingandroid.BR.contacts,contactsObject);
holder.getBindings().executePendingBindings();
}
@Override
public intgetItemCount() {
return phoneContacts.size();
}
}
</Contacts>
</Contacts>
</ContactsViewHolder>
MainActivity.java
package com.databinding.com.databindingandroid;
import android.os.Bundle;
import android.support.v7.app.AppCompatActivity;
import android.support.v7.widget.GridLayoutManager;
import android.support.v7.widget.RecyclerView;
import com.databinding.com.databindingandroid.model.Contacts;
import java.util.ArrayList;
import java.util.List;
public class MainActivityextends AppCompatActivity {
ContactsAdapteradapter;
private RecyclerViewrecyclerView;
@Override
protected void onCreate(Bundle savedInstanceState) {
super.onCreate(savedInstanceState);
setContentView(R.layout.activity_main);
recyclerView=(RecyclerView) findViewById(R.id.recycler_view);
GridLayoutManagermyGrid=new GridLayoutManager(this,1);
recyclerView.setLayoutManager(myGrid);
recyclerView.setHasFixedSize(true);
adapter=new ContactsAdapter(this,phoneContacts());
recyclerView.setAdapter(adapter);
}
private List
<Contacts>
phoneContacts(){
List
<Contacts>
contacts=new ArrayList<>();
contacts.add(new Contacts("Danial","001239",R.drawable.phone));
contacts.add(new Contacts("kalash","357875",R.drawable.phone));
contacts.add(new Contacts("Haris","348884",R.drawable.phone));
contacts.add(new Contacts("Awais","85385",R.drawable.phone));
contacts.add(new Contacts("Justin","05645",R.drawable.phone));
contacts.add(new Contacts("Biber","252543",R.drawable.phone));
contacts.add(new Contacts("Nemok","757777",R.drawable.phone));
contacts.add(new Contacts("Jasmine","555454",R.drawable.phone));
contacts.add(new Contacts("Lili","347388",R.drawable.phone));
contacts.add(new Contacts("Ratle","909359",R.drawable.phone));
contacts.add(new Contacts("Jhon","732943",R.drawable.phone));
return contacts;
}
}
</Contacts>
</Contacts>
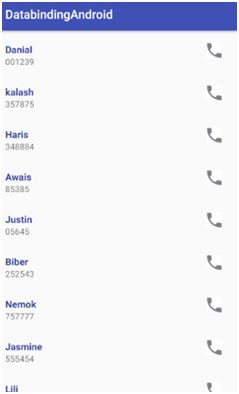
Application at Runtime: