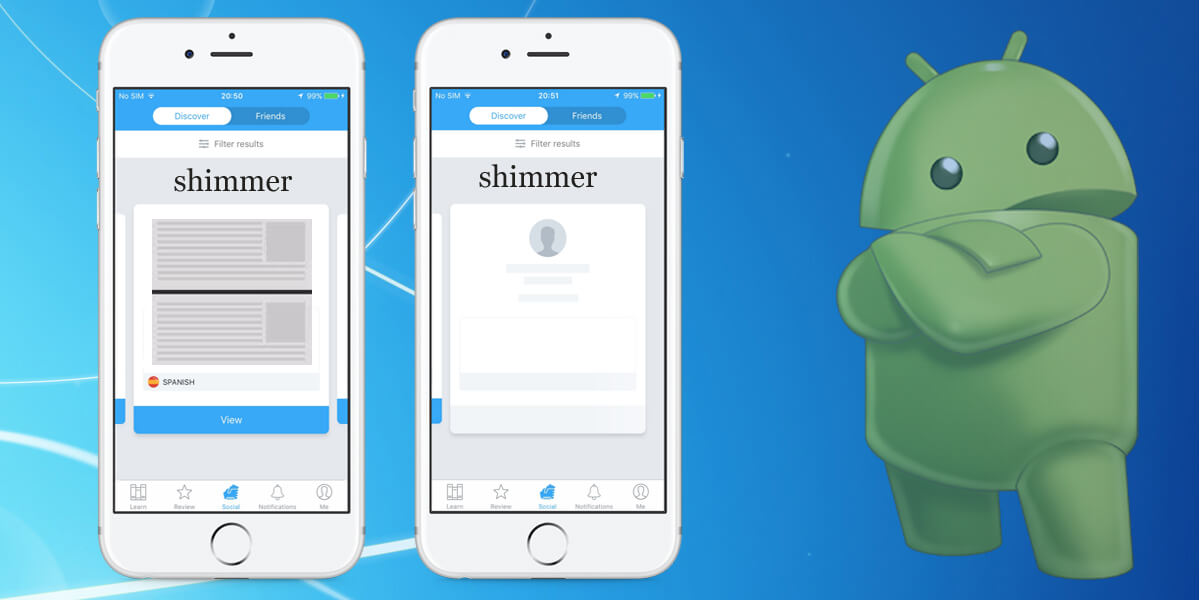
Progress bar or spinner loaders are used in applications to load the data on screens whenever application gets the data from a network call. These spinners are in horizontal or circular styles displays on screens to load data but now lets have some change in your android applications to make them more interesting and impressive by using cool shimmer animation in your application’s views which makes your front end design more attractive and appealing.
For this you have to use an open source android shimmer library which was intimately developed by facebook and not only implemented by facebook but by linkedin premium and udemy as well. This feature is used by Facebook in a way like displaying status when loading the news feed, wallpaper settings and opening notifications.
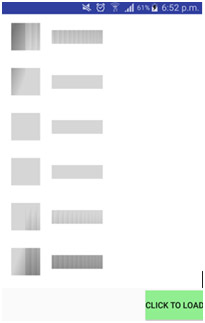
Simmer is an android layout which nest any view inside it using a “ShimmerFrameLayout” tag.You can specify the values for the layout either on the tag(using custom attributes) or programmatically in your code, and generate an animation on the fly.In order to get this services don’t forget to use the shimmer dependency in your application.
In the given example below I have developed a simple android project in which a shimmer animation is applied to a list view data. Shimmer will start as the application get started and will stop on button click with displaying the data on a listview.You can obtain shimmer effects in any view in your application wherever you want with the help of ShimmerFrameLayout.
Here we go for android project…!
1. Project creation:
- Open the development environment android studio click on File ->New->New Project->then select the basic activity from layouts.
- In order to use shimmer effects in your application’s layout , you have to add the shimmer dependency in your project’s build.gradle(module level) file and rebuild the project.
build.gradle
dependencies { implementation fileTree(dir: 'libs', include: ['*.jar']) implementation 'com.android.support:appcompat-v7:26.1.0' implementation 'com.facebook.shimmer:shimmer:0.1.0@aar' }
- I have created an xml file named as activity_main.xml with constraint layout and add the ShimmerFrameLayout inside it.Add the below code in activity_main.xml file of your project’s resources folder.
activity_main.xml
<?xml version="1.0" encoding="utf-8" ?>
<android.support.constraint.ConstraintLayoutxmlns:android ="http://schemas.android.com/apk/res/android" xmlns:app="http://schemas.android.com/apk/res-auto" xmlns:shimmer="http://schemas.android.com/apk/res-auto" xmlns:tools="http://schemas.android.com/tools" android:layout_width="match_parent" android:layout_height="match_parent" android:background="@android:color/white" tools:context=".MainActivity">
<com.facebook.shimmer.ShimmerFrameLayout android:id="@+id/shimmer_view" android:layout_width="wrap_content" android:layout_height="485dp" android:layout_gravity="center" android:orientation="vertical">
<!-- Adding 6 rows of placeholders -->
<LinearLayout android:layout_width="200dp" android:layout_height="600dp" android:orientation="vertical">
<include layout="@layout/placeholder" />
<include layout="@layout/placeholder" />
<include layout="@layout/placeholder" />
<include layout="@layout/placeholder" />
<include layout="@layout/placeholder" />
<include layout="@layout/placeholder" />
</LinearLayout>
</com.facebook.shimmer.ShimmerFrameLayout>
<ListView android:id="@+id/list" android:layout_width="match_parent" android:layout_height="500dp" android:layout_alignParentLeft="true" android:layout_alignParentStart="true" android:paddingBottom="0dp" />
<Button android:id="@+id/button" android:layout_width="wrap_content" android:layout_height="wrap_content" android:text="@string/btnText" android:background="@color/colorAccent" tools:layout_editor_absoluteX="66dp" tools:layout_editor_absoluteY="503dp" tools:ignore="MissingConstraints" />
</android.support.constraint.ConstraintLayout>
</android.support.constraint.ConstraintLayoutxmlns:android>
<?xml version="1.0" encoding="utf-8" ?>
<RelativeLayoutxmlns:android ="http://schemas.android.com/apk/res/android" xmlns:tools="http://schemas.android.com/tools" android:layout_width="wrap_content" android:layout_height="65dp" android:background="@drawable/textbox">
<ImageView android:id="@+id/imageView" android:layout_width="@dimen/placeholder_image" android:layout_height="@dimen/placeholder_image" android:layout_alignParentStart="true" android:layout_alignParentTop="true" android:layout_gravity="center" android:layout_marginTop="10dp" android:layout_marginLeft="20dp" android:scaleType="centerCrop" tools:ignore="RtlCompat" />
<TextView android:id="@+id/textView" android:layout_gravity="center" android:layout_width="@dimen/placeholder_text_width" android:layout_height="@dimen/placeholder_text_height" android:textSize="20dp" android:textColor="@color/colorBlack" android:layout_marginStart="90dp" android:layout_marginTop="15dp" tools:ignore="RtlCompat" android:layout_alignParentEnd="true" android:layout_centerVertical="true" android:layout_marginEnd="128dp" />
</RelativeLayout>
</RelativeLayoutxmlns:android>
Make another layout file placeholder.xml in a layout folder to add views for your shimmer layout. I have made two views in this file and used this layout in activity_main.xml file using <include layout="@layout/placeholder" attribute/>
placeholder.xml
<?xml version="1.0" encoding="utf-8" ?>
<RelativeLayoutxmlns:android ="http://schemas.android.com/apk/res/android" xmlns:tools="http://schemas.android.com/tools" android:layout_width="match_parent" android:layout_height="wrap_content" android:padding="@dimen/activity_padding">
<View android:id="@+id/placeholder_imageView" android:layout_width="@dimen/placeholder_image" android:layout_height="@dimen/placeholder_image" android:layout_marginLeft="10dp" android:background="@color/timestamp" />
<View android:id="@+id/placeholder_TextView" android:layout_width="@dimen/placeholder_text_width" android:layout_height="@dimen/placeholder_text_height" android:layout_toRightOf="@+id/placeholder_imageView" android:layout_marginLeft="20dp" android:layout_marginTop="13dp" android:background="@color/timestamp" />
</RelativeLayout>
</RelativeLayoutxmlns:android>
- Add the below code in dimen file of our project’s resources.
dimens.xml
<!--?xml version="1.0" encoding="utf-8"?-->
<resources>
<dimenname ="activity_padding">
16dp</dimen>
<dimenname ="placeholder_imageheight">
20dp</dimen>
<dimenname ="placeholder_imagewidth">
80dp</dimen>
<dimenname ="placeholder_text_width">
200dp</dimen>
<dimenname ="placeholder_text_height">
25dp</dimen>
<dimenname ="padding_10">
10dp</dimen>
<dimenname ="timestamp">
11dp</dimen>
<dimenname ="placeholder_image">
50dp</dimen>
</dimenname>
</dimenname>
</dimenname>
</dimenname>
</dimenname>
</dimenname>
</dimenname>
</dimenname>
</resources>
- Add the below code in Strings.xml file of your project resources.
Strings.xml
<resources>
<string name="app_name">FacebookShimmer</string>
<string name="action_settings">Settings</string>
<string name="btnText">Click to load</string>
<string-array name="Res_names">
<item>Howdy</item>
<item>Roaster</item>
<item>Howdy</item>
<item>Roaster</item>
<item>Fijis</item>
<item>Howdy</item>
</string-array>
</resources>
- Below is the code snippet to get the Shimmer effect.
<com.facebook.shimmer.ShimmerFrameLayout android:id="@+id/shimmer_view" android:layout_width="wrap_content" android:layout_height="485dp" android:layout_gravity="center" android:orientation="vertical"></com.facebook.shimmer.ShimmerFrameLayout>
In this file I have created string type array in which I have stored string data to use it later in the listview.
- Initialize the shimmer in java file with the shimmer view in layout file .
ShimmerFrameLayout shimmer_layout=(ShimmerFrameLayout) findViewById(R.id.shimmer_view);
- To start the shimmer animation, call startShimmerAnimation() function of the android’s ShimmerFrameLayout class.
- To stop the shimmer animation, call stopShimmerAnimation() function of the android’s ShimmerFrameLayout class.
- Initialize all the layout views in MainActivity.java file
shimmer_layout=(ShimmerFrameLayout) findViewById(R.id.shimmer_view);
listview=(ListView)findViewById(R.id.list);
btn_load=(Button) findViewById(R.id.button);
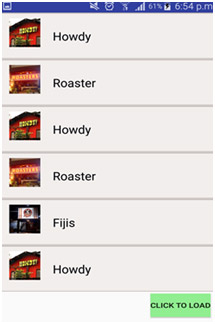
- Initially I have set listview’s visibility to Gone and start the shimmer animation.As I click on the button the shimmer will stop and the data in a listview will be displayed on the screen
listview.setVisibility(View.GONE);
shimmer_layout.startShimmerAnimation();
- load_data() function will be invoked on button click
btn_load.setOnClickListener(new View.OnClickListener() {
@Override
public void onClick(View view) {
load_data();
}
});
- Get string array data from string.xml file of your project’s resources folder
res_names=getResources().getStringArray(R.array.Res_names);
Inside load_data() function shimmer animation will stop using stopShimmerAnimation() function and its visibility will be Gone on setVisibility(View.GONE) function.
ListAdapter will load the data in a listview with the help of setAdapter(customizedList) method.
Add the below full code snippet in MainActivity.java
MainActvity.java
package com.facebookshimmer.com.facebookshimmer;
import android.os.Bundle;
import android.support.v7.app.AppCompatActivity;
import android.view.View;
import android.widget.ArrayAdapter;
import android.widget.Button;
import android.widget.ListView;
import com.facebook.shimmer.ShimmerFrameLayout;
public class MainActivityextends AppCompatActivity { //declaring a shimmer ShimmerFrameLayoutshimmer_layout;
ListViewlistview; ArrayAdapter
<String>
adapter; Button btn_load; //getting all the image from drawable resources int[] res_images={R.drawable.howdy,R.drawable.rosters,R.drawable.howdy, R.drawable.rosters,R.drawable.fijis,R.drawable.howdy}; String[] res_names; CustomizedListcustomizedList; @Override protected void onCreate(Bundle savedInstanceState) { super.onCreate(savedInstanceState); setContentView(R.layout.activity_main); shimmer_layout=(ShimmerFrameLayout) findViewById(R.id.shimmer_view); listview=(ListView)findViewById(R.id.list); btn_load=(Button) findViewById(R.id.button); listview.setVisibility(View.GONE); shimmer_layout.startShimmerAnimation(); btn_load.setOnClickListener(new View.OnClickListener() { @Override public void onClick(View view) { load_data(); } }); //getting all the restaurant names from string.xml file res_names=getResources().getStringArray(R.array.Res_names); //initializing adapter to load data in a listview adapter = new ArrayAdapter
<String>
(this, android.R.layout.simple_list_item_1, res_names); } private void load_data() { shimmer_layout.stopShimmerAnimation(); shimmer_layout.setVisibility(View.GONE); listview.setVisibility(View.VISIBLE); customizedList=new CustomizedList(this,res_names,res_images); listview.setAdapter(customizedList); } }
</String>
</String>
Cutomized list class is used as a single cell oflistview.
customizedList.java
<?xml version="1.0" encoding="UTF-8" ?>
package com.facebookshimmer.com.facebookshimmer;
import android.content.Context;
import android.view.LayoutInflater;
import android.view.View;
import android.view.ViewGroup;
import android.widget.BaseAdapter;
import android.widget.ImageView;
import android.widget.TextView;
public class CustomizedListextends BaseAdapter { String[] restaurant_name;
int[] restaurant_images;
Context mContext;
LayoutInflaterinflater;
public CustomizedList(Context context, String[] res_names, int[] res_images) { this.restaurant_name= res_names;
this.restaurant_images=res_images; this.mContext=context;
inflater=(LayoutInflater)context.getSystemService(Context.LAYOUT_INFLATER_SERVICE); }
@Override public intgetCount() { return restaurant_name.length; }
@Override public Object getItem(intposition) { return position; }
@Override public long getItemId(intposition) { return position; }
@Override public View getView(intposition, View convertView, ViewGroup parent)
{ View view; TextView text; ImageView image; view=inflater.inflate(R.layout.activity_customizedlist,null); text=(TextView) view.findViewById(R.id.textView); image=(ImageView) view.findViewById(R.id.imageView); text.setText(restaurant_name[position]); image.setImageResource(restaurant_images[(position)]); return view; } }
2. Running android Application
Shimmer effects on Custom views
Shimmer Attributes:
Shimmer provides multiple custom attributes which you can command to change the appearance and pace of the shimmer animations.
-
Shimmer angle
The angle must be between -45 and 45.It defines the angle of the shimmer line. Default angle value is 20.
-
Shimmer autoStart
Default value for this feature is false. shimmer_auto_start function is used to start the animation automatically without calling startShimmerAnimation method.
-
Shimmer color
This attribute describe the color of shimmer line.The center color and the edge color would be the same with the decreased alpha value and the default value for this attribute is #A2878787
-
Shimmer animation duration
Defines the total time of the animation in miliseconds.its default values is 1500
-
Reversed Shimmer Animation
Its default value is false which means the animation will start from the left side of the view but if you want to reverse the process, just change the value from false to true, the animation will start from the right side of the view.
-
Shimmer center color width
The shimmer line gradient will starts with the transparent edge and move towards the center by attaining the color given with the shimmer color attribute.The width of center is not constant, it can be modified easily using the attribute shimmer_gradient_center_color_width. Its default value is 0.1
-
Shimmer mask width
Its default value is 0.5 which means the gradient initially cover only 0.5 part of the width and shimmer line width is half of the layout’s width at angle 0. So when 1 value is given to this attribute, the gradient will cover half of the layout's width.
In this tutorial, Android application development India are sharing its best experience about "ShimmerFrameLayout" and how it implements for android project.