JavaScript Required

We're sorry, but we doesn't work properly without JavaScript enabled.

Firebase-Push-Notification-in-Android

FCM or Firebase cloud messaging is a new version of GCM which is Google Cloud Messaging.It is a cross platform messaging platform that help to push messages across various devices. Firebase platform make a bridge in between server and the devices where push notification is going to be fired. We need to connect our server with FCM server to send push notification directly to our registered devices.The image given below will demonstrate the process. In this blog Android App Development Company India will explain it dedicatedly.

Firebase-Push-Notification-in-Android

Scope: Send Push Notification to various devices through Firebase Service in Android.

IDE: Android Studio.

Procedure:

Step 1:

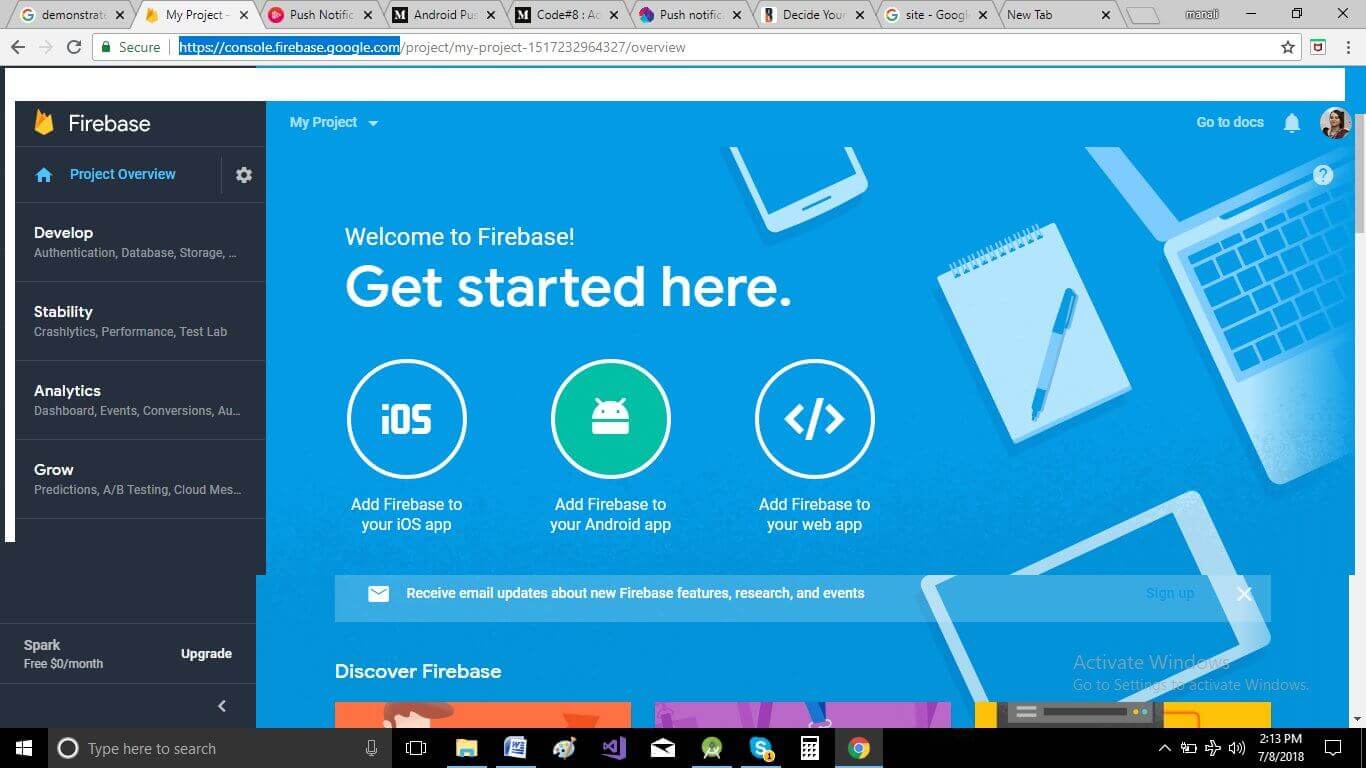
At first we need to connect our Application with firebase service. Due to this we need to create a project in Google firebase site. Just go to the web site https://console.firebase.google.com and create a new project, give project name and click ‘Add Firebase’.Below is the screen shot:
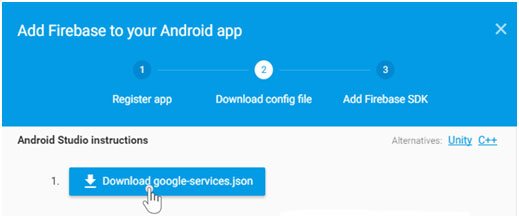
Firebase-Push-Notification-in-Android

Step 2:

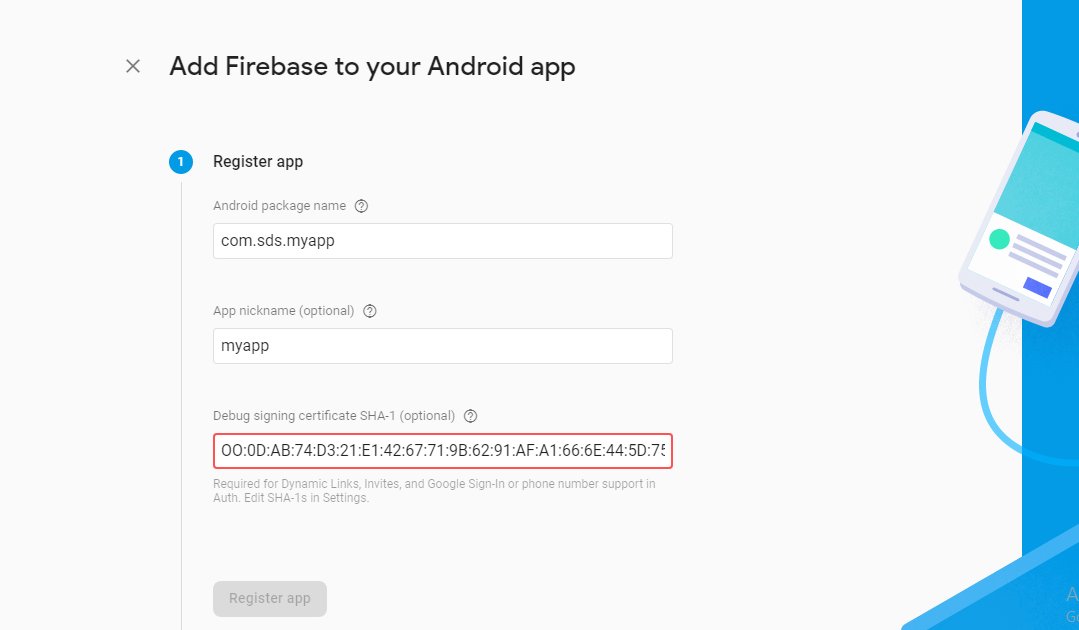
Next click on Add Firebase to your Android App. Below is the screenshot:

Firebase-Push-Notification-in-Android

Step 3:

Now enter your project package name and SHA1 key for identifying the perticular project and register it.

Need to be remembered that if you are debugging your app then you need to give debug keystore SHA-1 fingerprint.

When you release your App put here release keystore SHA-1 fingerprint.

Firebase-Push-Notification-in-Android

Step 4:

Download google-services.json file and click on CONTINUE button. You need to add this json service file to your existing project. We will discuss with it later.

Firebase-Push-Notification-in-Android

Now click on FINISH button and complete your project setup on Firebase Console.

Step 5:

Now go to your project and add this json file first. Next go to project level build.gradle file and add the following code into dependencies

dependencies { compile 'com.google.android.gms:play-services:9.0.0' // Add this line compile 'com.google.firebase:firebase-messaging:9.0.0' } // Add this line apply plugin: 'com.google.gms.google-services'

Step 6:

Next extend two java classes in your Android Project main package with preferably these names:

  • FireBaseInstanceIDService.java
  • FireBaseMessagingService.java

Things need to be remembered that:

To make this process smoothly and get the correct Firebase token all the version of FCM dependency libraries should be same with previous gms libraries. Otherwise it may give error at compile time of the application.

Step 7:

Next in Android Manifest file put the internet permission and register two classes that is required for firebase messaging service implementation

<manifest xmlns:android="http://schemas.android.com/apk/res/android" package="com.example.manali.myapplication"> <uses-permission android:name="android.permission.INTERNET" /> <application android:allowBackup="true" android:icon="@mipmap/ic_launcher" android:label="@string/app_name" android:roundIcon="@mipmap/ic_launcher_round" android:supportsRtl="true" android:theme="@style/AppTheme"> <activity android:name=".MainActivity" android:label="@string/app_name" android:theme="@style/AppTheme.NoActionBar"> <intent-filter> <action android:name="android.intent.action.MAIN" /> <category android:name="android.intent.category.LAUNCHER" /> </intent-filter> </activity> <service android:name=".MyFirebaseMessagingService"> <intent-filter> <action android:name="com.google.firebase.MESSAGING_EVENT" /> </intent-filter> </service> <service android:name=".MyFirebaseInstanceIDService"> <intent-filter> <action android:name="com.google.firebase.INSTANCE_ID_EVENT" /> </intent-filter> </service> </application> </manifest>

Step 8:

Next we need to register our devices to firebase cloud centre. After successful registration we will get a device token. We need to send this device token to our server which will connect firebase cloud directly and send push notification to our devices.

Now create MyFirebaseInstanceIDService.java class

import android.view.Menu; import android.view.MenuItem; import android.view.View; import com.google.firebase.iid.FirebaseInstanceId; import com.google.firebase.iid.FirebaseInstanceIdService; public class MyFirebaseInstanceIDService extends FirebaseInstanceIdService { @Override public void onTokenRefresh() { //For registration of token String refreshedToken = FirebaseInstanceId.getInstance().getToken(); //To displaying token on logcat Log.d("TOKEN: ", refreshedToken); } }

Step 9:

Now create MyFirebaseMessagingService.java class.

Here onMessageReceived function will fire when device get a push notification from FCM platform i.e when the target device receives a notification, onMessageReceived is called. We already have the remoteMessage object, which contains all the information that we received about the notification. Now through   NotificationCompat.Builder we set this message as notification to mobile devices and also set the onclick redirection page from this notification. Below is detail codes:

import android.app.NotificationManager; import android.app.PendingIntent; import android.content.Context; import android.content.Intent; import android.media.RingtoneManager; import android.net.Uri; import android.os.Bundle; import android.support.design.widget.FloatingActionButton; import android.support.design.widget.Snackbar; import android.support.v4.app.NotificationCompat; import android.support.v7.app.AppCompatActivity; import android.view.Menu; import android.view.MenuItem; import android.view.View; import com.google.firebase.messaging.FirebaseMessagingService; import com.google.firebase.messaging.RemoteMessage; public class MyFirebaseMessagingService extends FirebaseMessagingService { @Override public void onMessageReceived(RemoteMessage message) { sendMyNotification(message.getNotification().getBody()); } private void sendMyNotification(String message) { //On click of notification it redirect to this Activity Intent intent = new Intent(this, MainActivity.class); intent.addFlags(Intent.FLAG_ACTIVITY_CLEAR_TOP); PendingIntentpendingIntent = PendingIntent.getActivity(this, 0, intent, PendingIntent.FLAG_ONE_SHOT); Uri soundUri= RingtoneManager.getDefaultUri(RingtoneManager.TYPE_NOTIFICATION); NotificationCompat.Builder notificationBuilder = new NotificationCompat.Builder(this) .setSmallIcon(R.mipmap.ic_launcher)//notification icon .setContentTitle("My Firebase Push notification") .setContentText(message) .setAutoCancel(true) .setSound(soundUri) .setContentIntent(pendingIntent); NotificationManagernotificationManager = (NotificationManager) getSystemService(Context.NOTIFICATION_SERVICE); notificationManager.notify(0, notificationBuilder.build()); } }

We can use NotificationChannel class to differentiate between different types of push notifications and accordingly set up their functionality. For example we can differentiate notification sound, icon, design, and importance according to the push notification channel type. Users have full control of the settings of this notification channel. User can see their settings they have made for this type of notifications. But to build this notification channel our target SDK version must meet Android Oreo (SDK version 26) or above that.

@RequiresApi(api = Build.VERSION_CODES.O)//if version is Andorid Oreo private void setupChannels(){ CharSequence ParticularChannelName = getString(R.string.notifications _channel_name); String ParticularChannelDescription = getString(R.string.notifications _channel_description); NotificationChannel ParticularChannel; ParticularChannel = new NotificationChannel(CHANNEL_ID, ParticularChannelName, NotificationManager.IMPORTANCE_LOW); ParticularChannel.setDescription(ParticularChannelDescription); ParticularChannel.enableLights(true); ParticularChannel.setLightColor(Color.RED); ParticularChannel.enableVibration(true); if (notificationManager != null) { notificationManager.createNotificationChannel(ParticularChannel); } }

Above code CHANNEL_ID is a string. So every time we use NotificationCompat.Builder to create a new notification, we need to initialize the builder object and pass in the id in the constructor like below:
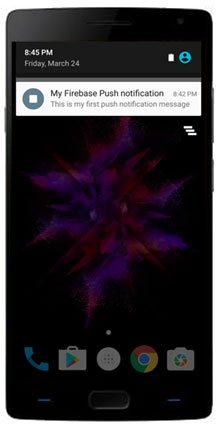
NotificationCompat.Builder notificationBuilder = new NotificationCompat.Builder(this, CHANNEL_ID)

Step 10:

Now for testing purpose of sending push notifications go to Firebase Console and click on your project and next click on Notifications. And from there you can send your first message for testing purpose. Following is the screenshot:

Firebase-Push-Notification-in-Android
Image