Getting Started
In this tutorial, you are going to create a Ruler control (in centimetre and inch). To keep things clean, you’ll use ordinary UIKit APIs.
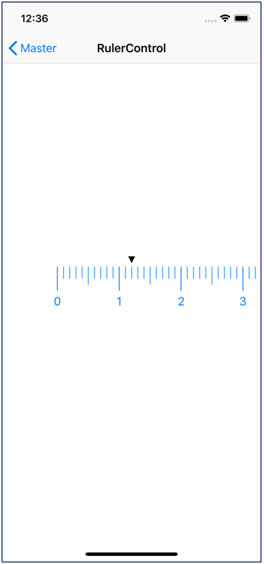
![img]()
Ruler control in centimetre
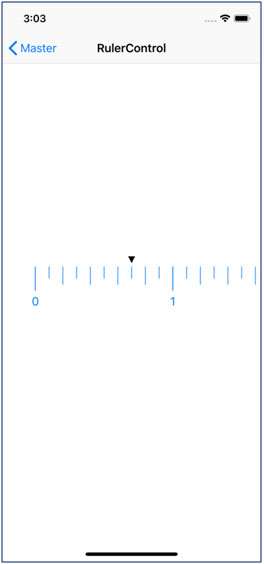
![img]()
Ruler control in inch
To follow along with this tutorial, you’ll need the following:
- Experience with CALayer.
- Experience with UIScrollView APIs.
- Familiarity with Auto Layout concepts.
Length class
In this class, we will:
- Define length units which the ruler will support.
- Define conventions how many pixels we’ll draw for one length unit.
- Add functions to convert between pixel and a length unit.
class Length {
// MARK: - Types
// MARK: - Constants
// MARK: - Convenience
}
Let’s add body code step-by-step:
1. Define an enum Unit with inch and centimeter
// MARK: - Types
enum Unit {
case centimeter
case inch
}
Our ruler will support 2 most popular units of length: centimeter (cm) and inch (in).
2. Define length in pixel for 1cm / 1in
// MARK: - Constants
privatestruct Constants {
static let pixelInCentimetre : CGFloat = 80
static let pixelInInch : CGFloat = 200
}
You can define length as you want. Because 1in = 2.54cm, pixelInInch should be about pixelInCentimetre*2.54.
3. Add functions to convert between pixel and centimetre, between pixel and inch
// MARK: - Convenience
staticfunc pixels(fromInch value: CGFloat) ->CGFloat {
return value * Constants.pixelInInch
}
staticfunc pixels(fromCentimeter value: CGFloat) ->CGFloat {
return value * Constants.pixelInCentimetre
}
staticfunc inch(fromPixels value: CGFloat) ->CGFloat {
return value / Constants.pixelInInch
}
staticfunc centimeter(fromPixels value: CGFloat) ->CGFloat {
return value / Constants.pixelInCentimetre
}
Just normal mathematical formulas.
LengthUnitLayer class
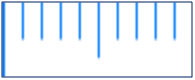
In this class, we’ll create a layer to draw a unit of length (1cm / 1in).
![img]()
1 cm
![img]()
1 m
classLengthUnitLayer: CALayer {
// MARK: - Properties
// MARK: - View Life Cycle
}
Let’s add body code step-by-step:
1. Declare some properties
// MARK: - Properties
private let unit : Length.Unit
private let lineWidth : CGFloat
private let lineColor : CGColor
privatevarunitWidth : CGFloat {
switch unit {
case .centimeter:
returnLength.pixels(fromCentimeter: 1.0)
case .inch:
returnLength.pixels(fromInch: 1.0)
}
}
privatevarspaceBetweenLines : CGFloat {
returnunitWidth/10
}
privatevarlayerWidth : CGFloat {
return (unitWidth + lineWidth)
}
Here we have:
- unit: which unit of length for the ruler.
- lineWidth: how many pixels for width of a line.
- lineColor: which color we’ll draw for the ruler.
- unitWidth: the length in pixel for 1cm / 1in.
- spaceBetweenLines: the length in pixel between two lines.
- layerWidth: the length in pixel of this layer.
2. Draw a length unit
// MARK: - View Life Cycle
requiredinit?(coder aDecoder: NSCoder) {
fatalError("init(coder:) has not been implemented")
}
init(unit: Length.Unit, lineWidth: CGFloat, lineColor: CGColor, height: CGFloat) {
self.unit = unit
self.lineWidth = lineWidth
self.lineColor = lineColor
super.init()
frame = .init(x: 0, y: 0, width: layerWidth, height: height)
}
overridefunc draw(in ctx: CGContext) {
ctx.setStrokeColor(lineColor)
ctx.setLineWidth(lineWidth)
ctx.beginPath()
fori in 0...10 {
let x = lineWidth/2 + CGFloat(i)*spaceBetweenLines
let y: CGFloat = {
switch unit {
case .centimeter:
if (i % 10 == 0) {
returnbounds.height
} else if (i % 5 == 0) {
returnbounds.height * 0.75
} else {
returnbounds.height * 0.5
}
case .inch:
if (i % 10 == 0) {
returnbounds.height
} else if (i % 2 == 0) {
returnbounds.height * 0.75
} else {
returnbounds.height * 0.5
}
}
}()
ctx.move(to: .init(x: x, y: 0))
ctx.addLine(to: .init(x: x, y: y))
}
ctx.strokePath()
ctx.flush()
}
The remarkable point is you need to override the function draw(in: CGContext).Here, we’re usingmove(to: CGPoint)and addLine(to: CGPoint)to draw 1 line. And we need 10 lines for a unit of length.
RulerView class
In this class, we’ll create a ruler view with one or many units of length, and labels.
classRulerView: UIView {
// MARK: - Constants
// MARK: - Properties
// MARK: - View Life Cycle
// MARK: - Setup
// MARK: - Layout
}
Let’s add body code step-by-step:
1. Declare some constants
// MARK: - Constants
privatestruct Constants {
static let labelWidth : CGFloat = 100
static let labelHeight : CGFloat = 20
static let labelMarginTop : CGFloat = 5
static let rulerHeight : CGFloat = 100
}
Here we have:
- labelWidth: the width in pixel for a label in the ruler (0, 1, 2,…).
- labelHeight: the height in pixel for a label in the ruler.
- labelMarginTop: vertical space between area of lines and area of labels.
- rulerHeight: the height of lines’ area.
2. Declare some properties
// MARK: - Properties
overridevartintColor: UIColor! {
didSet { _updateStyle().setNeedsDisplay() }
}
internal let unit : Length.Unit
internal let length : CGFloat
privatevarlineWidth : CGFloat
privatevarreplicatorLayer : CAReplicatorLayer?
privatevar labels : [UILabel]?
privatevarlengthUnitWidth : CGFloat {
switch unit {
case .centimeter:
returnLength.pixels(fromCentimeter: 1.0)
case .inch:
returnLength.pixels(fromInch: 1.0)
}
}
We go over this step-by-step:
- Override the tintColor variable: every time we set a value, we update color for lines and labels. _updateStyle(): update color for labels. setNeedsDisplay(): call func draw again to render lines with the new color.
- unit: which unit of length for the ruler.
- length: how many length units we draw for the ruler.
- lineWidth: how many pixels for width of a line in the ruler.
- replicatorLayer: used to replicate a unit.
- labels: an array of labels in the ruler (0, 1, 2,…).
- lengthUnitWidth: length in pixels of the ruler.
3. Draw the ruler view
// MARK: - View Life Cycle
required init?(coder aDecoder: NSCoder) {
fatalError("init(coder:) has not been implemented")
}
init(unit: Length.Unit, length: CGFloat, lineWidth: CGFloat) {
self.unit = unit
self.length = length
self.lineWidth = lineWidth
super.init(frame: .zero)
let rulerWidth = lengthUnitWidth * length
frame = .init(x: 0, y: 0, width: rulerWidth, height: Constants.rulerHeight)
_setupLabels()
}
override func didMoveToWindow() {
super.didMoveToWindow()
_updateStyle()
}
override func draw(_ rect: CGRect) {
super.draw(rect)
replicatorLayer?.removeFromSuperlayer()
replicatorLayer = CAReplicatorLayer()
if let replicatorLayer = replicatorLayer {
replicatorLayer.instanceCount = Int(ceil(length))
replicatorLayer.instanceTransform = CATransform3DMakeTranslation(lengthUnitWidth, 0, 0)
let unitLayer = LengthUnitLayer(unit: unit, lineWidth: lineWidth, lineColor: tintColor.cgColor, height: frame.height)
unitLayer.frame = CGRect(x: -lineWidth/2, y: 0, width: unitLayer.bounds.width, height: (bounds.height - Constants.labelHeight - Constants.labelMarginTop))
unitLayer.setNeedsDisplay()
replicatorLayer.addSublayer(unitLayer)
layer.addSublayer(replicatorLayer)
}
labels?.enumerated().forEach { (offset, element) in
element.frame = .init(x: (CGFloat(offset)*lengthUnitWidth - Constants.labelWidth/2),
y: (bounds.height - Constants.labelHeight),
width: Constants.labelWidth,
height: Constants.labelHeight)
}
}
The remarkable point is you need to override the function draw(in: CGContext). Here, we’re using CAReplicatorLayerto draw the ruler with many units. It likes we draw a unit layer with 10 lines, then copy-paste that layer to create a ruler.
We also update frame for labels in the ruler every time we render it.
3. Add labels to the ruler view
// MARK: - Setup
@discardableResult
private func _setupLabels() -> Self {
labels?.forEach { $0.removeFromSuperview() }
labels = [UILabel]()
for i in 0...Int(ceil(length)) {
let label = UILabel()
label.text = "\(i)"
label.textAlignment = .center
addSubview(label)
labels?.append(label)
}
return self
}
This function returns an array of labels (0, 1, 2, …) for the ruler. In function draw() we set frame for them.
4. Add a function to update UI for the ruler
// MARK: - Layout
@discardableResult
private func _updateStyle() -> Self {
labels?.forEach { $0.textColor = tintColor }
return self
}
This function updates color to labels of the ruler.
Where to Go from Here
Now we already have a ruler view with width maybe longer than phone’s width. In next part of this tutorial, we will:
- Create a view control which allows user to scroll our ruler view.
- Add an indicator to the ruler.
- Add a function which is called every time user scrolls the ruler.
We're happy to share that knowledge with you. In this article, iOS App Development Company India is sharing its best skill about "Create a Ruler Control with Swift" and how it implements for iPhone project.