Android's Design Support Library includes many views and components specially for supporting material design. TextInputLayout is one such component which adds a wrapper around standard edittext widget thereby improving handling of hint text and error text.
TextInputLayout provides a floating label above to display the Hint text set in Edittext when Edittext gets the focus and an error label below the edittext to display any kind of error message or warning message after input validation.
For showing the error TextInputLayout provides two methods, setError() and setErrorEnabled(). SetErrorEnabled() accepts true/false as input, which will toggle the visibility of the text label used for displaying error message, and setError() to be called after setErrorEnabled(true), for setting the error message to be displayed to user.
Here, team of android developers India will create simple example which uses TextInputLayout with TextInputEditText. We will create two fields like email and password.
Dependency:
TextInputLayout is part of Design Support library so before using it we will need to add the dependencies for that in our app gradle file.
dependencies {
    .......
    compile 'com.android.support:design:24.2.1'
}
Though we have used design support library version 24.2.1, but you can user any version after 22.2.0 in which TextInputLayout was introduced.
Layout Design:
After adding required dependencies we can use the TextInputLayout view in our layout file. Here we will put TextInputLayout for email and password field and TextInputEditText view for both email and password like below:
layout/activity_main.xml:
<RelativeLayout xmlns:android="http://schemas.android.com/apk/res/android"
xmlns:app="http://schemas.android.com/apk/res-auto"
xmlns:tools="http://schemas.android.com/tools"
android:layout_width="match_parent"
android:layout_height="match_parent"
android:paddingBottom="@dimen/activity_vertical_margin"
android:paddingLeft="@dimen/activity_horizontal_margin"
android:paddingRight="@dimen/activity_horizontal_margin"
android:paddingTop="@dimen/activity_vertical_margin"
tools:context="com.example.textinputlayoutexample.MainActivity">
<android.support.design.widget.TextInputLayout android:id="@+id/til_email_layout"
android:layout_width="match_parent"
android:layout_height="wrap_content"
android:layout_marginBottom="10dp"
app:hintTextAppearance="@style/hintText">
<android.support.design.widget.TextInputEditText android:id="@+id/tiet_email"
android:layout_width="match_parent"
android:layout_height="wrap_content"
android:hint="Email"
android:inputType="textEmailAddress" />
</android.support.design.widget.TextInputLayout>
<android.support.design.widget.TextInputLayout android:id="@+id/til_password_layout"
android:layout_width="match_parent"
android:layout_height="wrap_content"
android:layout_below="@+id/til_email_layout"
app:counterEnabled="true"
app:counterMaxLength="8"
app:hintTextAppearance="@style/hintText"
app:passwordToggleEnabled="true">
<android.support.design.widget.TextInputEditText android:id="@+id/tiet_password"
android:layout_width="match_parent"
android:layout_height="wrap_content"
android:hint="Password"
android:inputType="textPassword"
android:maxLength="8" />
</android.support.design.widget.TextInputLayout>
</RelativeLayout>
In above layout we have used TextInputLayout and inside that we have put TextInputEditText for email. We have taken same views below that for password field. Now consider the property named app:hintTextAppearance which is used to customize the text of hint in our EditText field.
values/styles.xml: In above layout file we have used the customization for hint text appearance which indicates the attribute from styles.xml file. We have to put below tag in our style.xml file
<style name="hintText">
<item name="android:textColor" > @color/colorPrimary</item >
<item name="android:textSize" > 20sp</item >
</style>
We can customize size and color of hint text as our needs using above tag.
The Activity:
We have all setup to use the TextInputLayout in our main activity file. We have added dependencies and created our layout for activity. Now we will implement the views in our MainActivity:
MainActivity.java :
public class MainActivity extends AppCompatActivity {
TextInputEditText tlEtEmail, tlEtPassword;
TextInputLayout tilPasswordLayout, tilEmailLayout;
@Override
protected void onCreate(Bundle savedInstanceState) {
super.onCreate(savedInstanceState);
setContentView(R.layout.activity_main);
tilEmailLayout = (TextInputLayout)findViewById(R.id.til_email_layout);
tilPasswordLayout = (TextInputLayout)findViewById(R.id.til_password_layout);
tlEtEmail = (TextInputEditText)findViewById(R.id.tiet_email);
tlEtEmail.addTextChangedListener(new EditTextWatcher(this,tilEmailLayout,tlEtEmail));
tlEtPassword = (TextInputEditText)findViewById(R.id.tiet_password);
tlEtPassword.addTextChangedListener(new EditTextWatcher(this,tilPasswordLayout,tlEtPassword));
}
class EditTextWatcher implements TextWatcher{
TextInputLayout layout;
TextInputEditText view;
Context context;
public EditTextWatcher(Context con, TextInputLayout layout, TextInputEditText view){
this.view = view;
this.layout = layout;
this.context = con;
}
@Override
public void beforeTextChanged(CharSequence charSequence, int i, int i1, int i2) {
}
@Override
public void onTextChanged(CharSequence charSequence, int i, int i1, int i2) {
}
@Override
public void afterTextChanged(Editable editable) {
switch (view.getId()){
case R.id.tiet_email :
if(isEmailValid(tlEtEmail.getText().toString()) == false){
tilEmailLayout.setError("Invalid Email");
tlEtEmail.requestFocus();
}else{
tilEmailLayout.setErrorEnabled(false);
}
break;
case R.id.tiet_password :
if(isPasswordValid(tlEtPassword.getText().toString()) == false){
tilPasswordLayout.setError("Invalid Password");
tlEtPassword.requestFocus();
}else{
tilPasswordLayout.setErrorEnabled(false);
}
break;
}
}
}
public static boolean isEmailValid(String email){
return !TextUtils.isEmpty(email) && android.util.Patterns.EMAIL_ADDRESS.matcher(email).matches();
}
public static boolean isPasswordValid(String password){
return !TextUtils.isEmpty(password) && password.trim().length()==8 ;
}
}
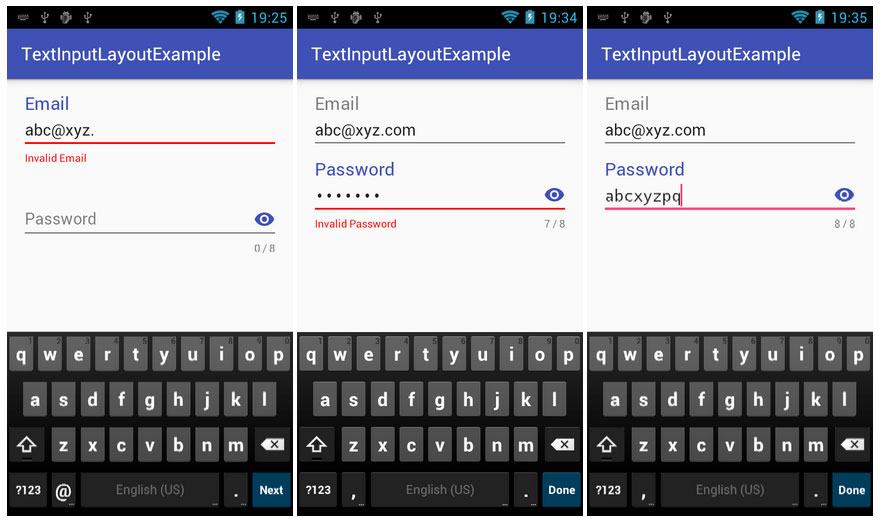
In above code we have used two fields for email and password with validation of email and password length. We have created the class called EditTextWatcher which is used to track the EditText changes as user types in. It has method called afterTextChanges(...) inside that we have put the condition to display error message by checking the condition inside the methods named isEmailValid(...) to validate the email address entered in email field and .isPasswordValid(...) to check the password length.
TextInputLayout provides some default behavior like password length. It will display the characters count at bottom right of the TextInputEditText view to show user how many characters have been entered.
Application Screens:
![textinput]()
This article is written by experts of the android development community. The team of Android developers India has explained this tutorial on how to integrate textinput Layout in Android. If there is any query, you can ask them directly through comments. Don’t forget to share this article with your social fans and followers.