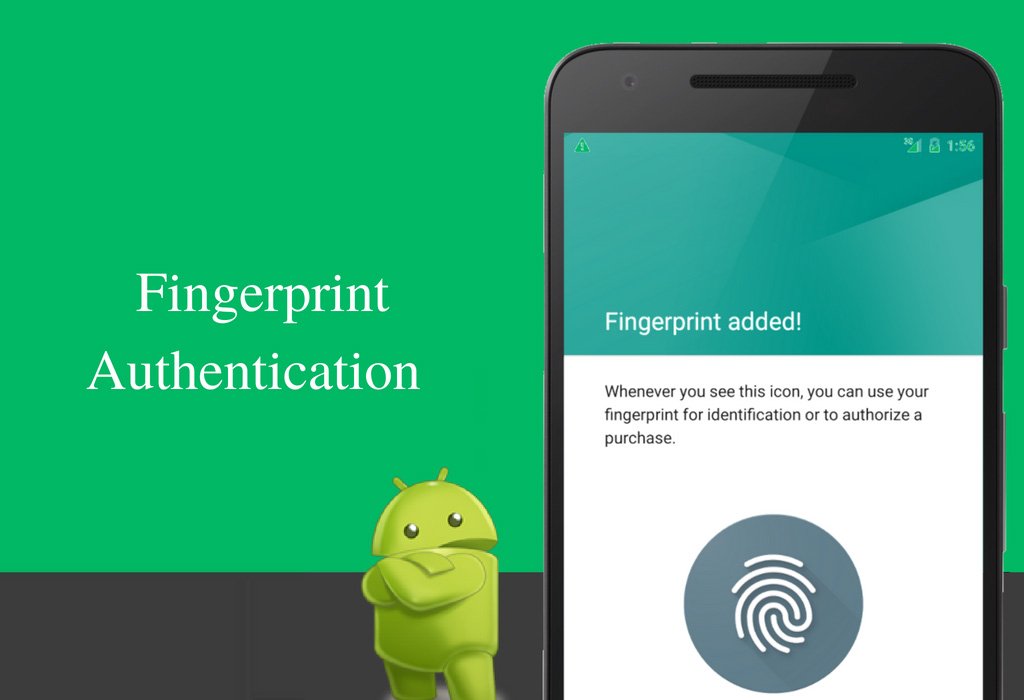
Android versions 6.0 (marshmallow) and onwards come with finger print authentication support. It is a more convenient way for users to get authenticated with a single touch. To achieve this goal finger print sensors are used to verify the identity of the user. It is a rather new security feature that has been used in mobile devices for quite some time now initially to help user's lock their home screens to now facilitating them to secure their applications by integrating this feature in-app-payments. This has helped replace the need for username and password with a single finger touch.
This feature is the more favorable, speedy and far easier method to get authenticated to a sensor by only a single touch rather than entering a PIN.
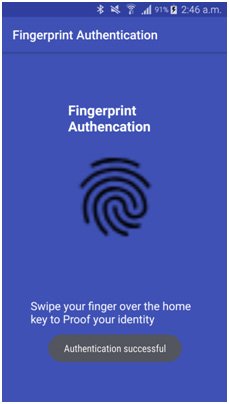
I am showing you the simple android application in which I have implemented user interface for the fingerprint authentication just to authenticate the user by swiping the finger over the home key and used the android standard fingerprint iconin my layout which I have placed in my project’s drawable folder. The app will start processes the input provided by the user with the help of fingertip against the device touch sensor.
Advantages of using fingerprints:
No more resetting of the password: Mostly, people use to forget their passwords and in order to get them back, they have to follow the procedures of resetting the password which is very irritating and annoying for the users. So one can recover or reset the password, but obviously, he has to pass through the little pain. It will waste their time and also require the user effort, so by adding up the fingerprint authentication feature, you are relaxing the user by no more recoveries or resetting of the passwords.
One of the quickest way to verify user identity:The traditional methods such as PIN code, pattern swiping or passwords are although the effective ways, but we can’t deny that requiring the input from the user add ups an extra effort to the user experience. In addition, memorizing these passwords, PIN codes and patterns are also very difficult for the common users. So touching by the fingertip is far easier than recalling the passwords or the PIN codes as it provides both the safety as well as the effortless user experience.
Unique identification: Even if the user uses the strong passwords for the security, there is no guarantee that no one can hack that password. In this way, one can make the security feature even more insecure. The fingerprint is unique and no one can hack or access the fingerprint so we can say that it is 100% secure and cannot be accessed by any spyware.
No more struggle with typing a long password: Not only longer passwords are difficult to memorize, but also it is difficult to type on the small mobile screens. Even if the passwords are stored in your app cache and you have to type it once per session, still it can be the most annoying experience for the user. So no one wants to type a long and complex password rather than this everyone will prefer a single touch authentication without creating any messy situation.
No need to memorize fingerprints: Everyone is busy in the day to day task and it is difficult to memorize so many passwords and PIN codes. So instead of the long password that includes different symbols and keywords, it is better to open up the lock screen by a simple fingerprint authentication method which is not only easy but also secure at the same time.
Creating a project
Android Developers India are explainfew steps to perform fingerprint authentication. Make a sample app to get an effective way of understanding the steps
Open Android Studio and create a new project.In a window “Target android Devices”, make sure to select the minimum SDK 23 which is android 6.0(marshmallow) or higher, as the fingerprint feature is not supported by android versions lower than 6.0
Adding permissions to the manifest file:
Manifest file is the configuration file of your project.You need to include all the activities and add all the permissions of features you are using in your application .Therefore in this projectwe are going to implement the simple android application that uses device touch sensor toauthenticate the userand will require the access for it to receive fingertip touch event. In order to make your app functioning on touch sensor you must include the below given permission in your project’s manifest file.
<uses-feature android:name="android.hardware.fingerprint" android:required="true"
android:required="true"
feature in your app will allow users to install your application only on devices that satisfy all of these hardware requirements.
In your manifest file you should mark the touch sensor feature as preferred but not required If your application can function without a fingerprint sensor.
android:required="false"
This allow users to download your application even if fingerprint sensor is not supported by their devices and the app will be checked at runtime for the presence of fingerprint sensor and then disable its fingerprint authentication features, where appropriate.
Request for a permission to access the fingerprint sensor
<uses-permission android:name="android.permission.USE_FINGERPRINT" />
AndroidManifest.xml
------------------
<?xml version="1.0" encoding="utf-8" ?>
<manifest xmlns:android="http://schemas.android.com/apk/res/android"
package="com.fingerprintauth.com.fingerprintauth">
<uses-feature android:name="android.hardware.fingerprint" android:required="true" />
<uses-permission android:name="android.permission.USE_FINGERPRINT" />
<application android:allowBackup="true"
android:icon="@mipmap/ic_launcher"
android:label="@string/app_name"
android:roundIcon="@mipmap/ic_launcher_round"
android:supportsRtl="true"
android:theme="@style/AppTheme">
<activity android:name=".MainActivity">
<intent-filter>
<action android:name="android.intent.action.MAIN" />
<category android:name="android.intent.category.LAUNCHER" />
</intent-filter>
</activity>
</application>
</manifest>
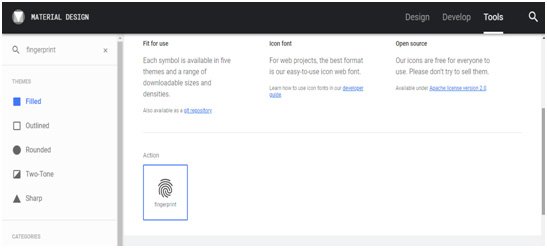
Download the standard fingerprint icon here https://material.io/tools/icons/?style=baseline that is suggested you to use for displaying whenever your app demands fingerprint authentication from the user and this icon is provided by the Google.
![Implementing]()
string.xml
<resources>
<string name="app_name">Fingerprint Authentication</string>
<string name="auth">Fingerprint Authencation</string>
<string name="instructions">Swipe your finger over the home key to Proof your identity</string>
</resources>
colors.xml
<?xml version="1.0" encoding="utf-8" ?>
<resources>
<color name="colorPrimary">#3F51B5</color>
<color name="colorPrimaryDark">#303F9F</color>
<color name="colorAccent">#FF4081</color>
<color name="colorText">#ffffff</color>
<color name="gray">#D3D3D3</color>
</resources>
activity_main.xml
<?xml version="1.0" encoding="utf-8" ?>
<RelativeLayoutxmlns:android ="http://schemas.android.com/apk/res/android"
xmlns:app="http://schemas.android.com/apk/res-auto"
xmlns:tools="http://schemas.android.com/tools"
android:id="@+id/activity_main"
android:layout_width="match_parent"
android:layout_height="match_parent"
android:background="@color/colorPrimary">
<TextView android:id="@+id/text2"
android:layout_width="240dp"
android:layout_height="wrap_content"
android:layout_alignParentEnd="true"
android:layout_alignParentTop="true"
android:layout_marginEnd="15dp"
android:layout_marginTop="78dp"
android:text="@string/auth"
android:textAppearance="@style/TextAppearance.AppCompat.Large"
android:textColor="@color/colorText"
android:textStyle="bold" />
<ImageView android:id="@+id/imageView"
android:layout_width="150dp"
android:layout_height="150dp"
android:layout_alignParentTop="true"
android:layout_centerHorizontal="true"
android:layout_marginTop="157dp"
app:srcCompat="@drawable/fingerprint" />
<TextView android:id="@+id/textView2"
android:layout_width="270dp"
android:layout_height="wrap_content"
android:layout_alignParentBottom="true"
android:layout_centerHorizontal="true"
android:layout_marginBottom="121dp"
android:text="@string/instructions"
android:textColor="@color/colorText"
android:textSize="18sp" />
</RelativeLayout>
</RelativeLayoutxmlns:android>
Implementation
To implement fingerprint Authentication in your app, you must keepin mind that the mobile device has the software, hardware and settings required to support the fingerprint authentication. For this you need to check the requirements mentioned below that are necessary to enable the fingerprint authentication feature in your app:
- You are using Android device 6.0 or higher version.
- The device you are using supports fingerprint sensor feature.
- Users must have registered at least one fingerprint on their mobile device.
- The user has granted app permission to access the fingerprint sensor.
-
Make sure that the users have protected their lock screens with either a pattern, password or PIN code before proceeding.
If any of the above requirements will not fulfill then your app will immobilize the features related to fingerprint authentication.
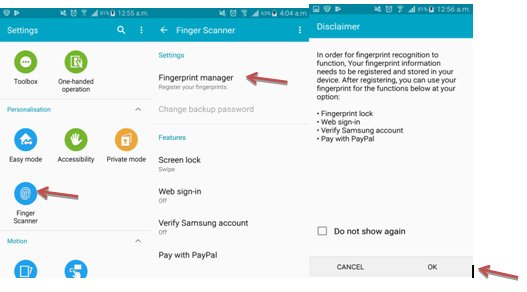
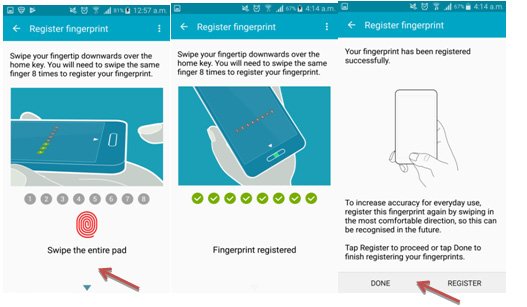
Steps to enable fingerprint in your mobile device
- Go to settings->personalization->then select Finger Scanner->Fingerprint Manager
- Click OK
- Read and follow the instructions on the screen to register a fingerprint
Now come to code in MainActvity.java
- To achieve the actual authentication, we need to create the key cipher and CryptoObject for it and the instance of aFingerprintManager class to verify the users.
-
Initialize the instance of keyguardManagerand FingerprintManagerclasses to use them to call their methods.
keyguardManager=(KeyguardManager) getSystemService(KEYGUARD_SERVICE)
fingerprintManager=(FingerprintManager) getSystemService(FINGERPRINT_SERVICE);
-
First “if condition” in the code will check the app’s minSDKversion is 23 or higher
if(Build.VERSION.SDK_INT>= Build.VERSION_CODES.M)
-
Inform users with the toast message if the Fingerprint sensor is not available in their devices.
if(!fingerprintManager.isHardwareDetected())
-
Check the user has granted your app permission, if not then prompt the user to enable fingerprint permission.
if(ActivityCompat.checkSelfPermission(this, Manifest.permission.USE_FINGERPRINT) != PackageManager.PERMISSION_GRANTED)
-
User must register atleast one fingerprint in the device settings.
if(!fingerprintManager.hasEnrolledFingerprints())
-
if the user has not secured the lockscreen with the password , pattern or a PIN code then display a toast message“please enable your lockscreen security in devices settings”
if(!keyguardManager.isKeyguardSecure())
The process of fingerprint authentication will start once all the above conditions will be true.
- intializeCipher() method is used to inilialize the cipher.
- After a successful initialization of cipher , the cipher instance will be used to create an encrypted CryptoObjectinstance.Assign the CryptoObject to the instantiated FingerprintManager.
cryptoObject= new FingerprintManager.CryptoObject(cipher)
generateEncryptionKey() method will be used to create the app’s encryption key.
-
Use the android standard keystore container identifier (AndroidKeyStore) to get a reference to a keystore
keyStore= KeyStore.getInstance("AndroidKeyStore")
Generate the key using keyGenerator.generateKey() method
Initialize the key generator
keyGenerator.init(newKeyGenParameterSpec.Builder(KEY_NAME,
  KeyProperties.PURPOSE_ENCRYPT|KeyProperties.PURPOSE_DECRYPT)
  .setBlockModes(KeyProperties.BLOCK_MODE_CBC)
  .setUserAuthenticationRequired(true)
      .setEncryptionPaddings(KeyProperties.ENCRYPTION_PADDING_PKCS7)
      .build())
-
initialize the cipher instance and set the properties required for fingerprint authentication
cipher= Cipher.getInstance(KeyProperties.KEY_ALGORITHM_AES+ "/"
  + KeyProperties.BLOCK_MODE_CBC+ "/"
  + KeyProperties.ENCRYPTION_PADDING_PKCS7)
-
Start the authentication process by using
handler.startAuth(fingerprintManager, cryptoObject)
method of FingerprintManager class.
- HandlerFingerPrint class contains all the function of FingerPrintManager
- onAuthenticationFailed() method will be called when the user’s entered fingerprint doesn’t match with any of the fingerprints registered on the mobile device.
- onAuthenticationSucceeded() method will be called when the user’s fingerprint matches with the fingerprint saved on the device.
MainActivity.java
package com.fingerprintauth.com.fingerprintauth;
import android.Manifest;
import android.app.KeyguardManager;
import android.content.pm.PackageManager;
import android.hardware.fingerprint.FingerprintManager;
import android.os.Build;
import android.security.keystore.KeyGenParameterSpec;
import android.security.keystore.KeyPermanentlyInvalidatedException;
import android.security.keystore.KeyProperties;
import android.support.annotation.RequiresApi;
import android.support.v4.app.ActivityCompat;
import android.support.v7.app.AppCompatActivity;
import android.os.Bundle;
import android.widget.Toast;
import java.io.IOException;
import java.security.InvalidAlgorithmParameterException;
import java.security.InvalidKeyException;
import java.security.KeyStore;
import java.security.KeyStoreException;
import java.security.NoSuchAlgorithmException;
import java.security.NoSuchProviderException;
import java.security.UnrecoverableKeyException;
import java.security.cert.CertificateException;
import javax.crypto.Cipher;
import javax.crypto.KeyGenerator;
import javax.crypto.NoSuchPaddingException;
import javax.crypto.SecretKey;
public class MainActivityextends AppCompatActivity {
// Declare a string variable for the key we’re going to use in our fingerprint authentication
private static final String KEY_NAME = "yourkey";
private Cipher cipher;
private KeyStorekeyStore;
private KeyGeneratorkeyGenerator;
private FingerprintManager.CryptoObjectcryptoObject;
private FingerprintManagerfingerprintManager;
private KeyguardManagerkeyguardManager;
HandlerFingerPrinthandler;
@RequiresApi(api = Build.VERSION_CODES.M)
@Override
protected void onCreate(Bundle savedInstanceState) {
super.onCreate(savedInstanceState);
setContentView(R.layout.activity_main);
//inilializes the instances of KeyguardManager and FingerprintManager//
keyguardManager=
(KeyguardManager) getSystemService(KEYGUARD_SERVICE);
fingerprintManager=
(FingerprintManager) getSystemService(FINGERPRINT_SERVICE);
//check your minSDKVersion is 23 or higher which means your device version is 6.0 or above , if it is lower than 23 then your app will not
//run the fingerprint code
if (Build.VERSION.SDK_INT>= Build.VERSION_CODES.M) {
//Check for a fingerprint sensor in your device//
if (!fingerprintManager.isHardwareDetected()) {
//prompt the user with the toast message that their device does not support fingerprint authentication
Toast.makeText(this, "Your device doesn't support fingerprint authentication", Toast.LENGTH_SHORT).show();
}
//Check whether the user has granted your app the USE_FINGERPRINT permission//
if (ActivityCompat.checkSelfPermission(this, Manifest.permission.USE_FINGERPRINT) != PackageManager.PERMISSION_GRANTED) {
// prompt user to enalbe fingerprint permission in device settings
Toast.makeText(this, "Please enable the fingerprint permission", Toast.LENGTH_SHORT).show();
}
//Check that the user has registered at least one fingerprint//
if (!fingerprintManager.hasEnrolledFingerprints()) {
// If the user hasn’t registered any fingerprint in the settings, then display the following message//
Toast.makeText(this, "No fingerprint in your device settings, please register atleast one", Toast.LENGTH_SHORT).show();
}
//Check lockscreen security//
if (!keyguardManager.isKeyguardSecure()) {
// If the user hasn’t secured their lockscreen with a PIN password or pattern then prompt the user with the toast message
Toast.makeText(this, "Open device settings to enable lockscreen security", Toast.LENGTH_SHORT).show();
}
else {
try {
generateEncryptionKey();
} catch (FingerprintException e) {
e.printStackTrace();
}
if (initializeCipher()) {
//If the cipher is initialized successfully, then create a CryptoObject instance
//create cipher object and use it to create an encrypted FingerprintManager.
cryptoObject= new FingerprintManager.CryptoObject(cipher);
// start the authentication process and authentication events
handler = new HandlerFingerPrint(this);
handler.startAuth(fingerprintManager, cryptoObject);
}
}
}
}
//create the encyption key and get the keystrore access
@RequiresApi(api = Build.VERSION_CODES.M)
private void generateEncryptionKey() throws FingerprintException {
try {
keyStore= KeyStore.getInstance("AndroidKeyStore");
keyGenerator= KeyGenerator.getInstance(KeyProperties.KEY_ALGORITHM_AES, "AndroidKeyStore");
//Initialize an empty KeyStore//
keyStore.load(null);
//Initialize the KeyGenerator//
keyGenerator.init(new
//key operations
KeyGenParameterSpec.Builder(KEY_NAME,
KeyProperties.PURPOSE_ENCRYPT|
KeyProperties.PURPOSE_DECRYPT)
.setBlockModes(KeyProperties.BLOCK_MODE_CBC)
//Configure this key so that the user has to confirm their identity with a fingerprint each time they want to use it//
.setUserAuthenticationRequired(true)
.setEncryptionPaddings(
KeyProperties.ENCRYPTION_PADDING_PKCS7)
.build());
//Generate the key//
keyGenerator.generateKey();
} catch (KeyStoreException
| NoSuchAlgorithmException
| NoSuchProviderException
| InvalidAlgorithmParameterException
| CertificateException
| IOExceptionexc) {
exc.printStackTrace();
throw new FingerprintException(exc);
}
}
//this method will use to initialize the cipher
@RequiresApi(api = Build.VERSION_CODES.M)
public booleaninitializeCipher() {
try {
//initialize the cipher instance and set with the propertise required for fingerprint authentication
cipher = Cipher.getInstance(
KeyProperties.KEY_ALGORITHM_AES+ "/"
+ KeyProperties.BLOCK_MODE_CBC+ "/"
+ KeyProperties.ENCRYPTION_PADDING_PKCS7);
} catch (NoSuchAlgorithmException |
NoSuchPaddingException e) {
throw new RuntimeException("Failed to get Cipher", e);
}
try {
keyStore.load(null);
SecretKey key = (SecretKey) keyStore.getKey(KEY_NAME,
null);
cipher.init(Cipher.ENCRYPT_MODE, key);
//if the cipher initialize successfully then reture true
return true;
} catch (KeyPermanentlyInvalidatedException e) {
//if cipher initialization fail then Return false
return false;
} catch (KeyStoreException | CertificateException
| UnrecoverableKeyException | IOException
| NoSuchAlgorithmException | InvalidKeyException e) {
throw new RuntimeException("Failed to init Cipher", e);
}
}
private class FingerprintExceptionextends Exception {
public FingerprintException(Exception e) {
super(e);
}
}
}
The helper class which is responsible for handling the authentication methods and triggered them to process various callback events which all depends on the type of authentication whether it is failed , succeeded or giving an error.
HandlerFingerPrint.java
package com.fingerprintauth.com.fingerprintauth;
import android.annotation.TargetApi;
import android.content.Context;
import android.content.pm.PackageManager;
import android.hardware.fingerprint.FingerprintManager;
import android.Manifest;
import android.os.Build;
import android.os.CancellationSignal;
import android.support.v4.app.ActivityCompat;
import android.widget.Toast;
@TargetApi(Build.VERSION_CODES.M)
public class HandlerFingerPrintextends FingerprintManager.AuthenticationCallback {
private CancellationSignalcancellationSignal;
private Context context;
public HandlerFingerPrint(Context mContext) {
context = mContext;
}
//the startAuth method will start the fingerprint authentication process
public void startAuth(FingerprintManager manager, FingerprintManager.CryptoObjectcryptoObject) {
cancellationSignal= new CancellationSignal();
if (ActivityCompat.checkSelfPermission(context, Manifest.permission.USE_FINGERPRINT) != PackageManager.PERMISSION_GRANTED) {
return;
}
manager.authenticate(cryptoObject, cancellationSignal, 0, this, null);
}
@Override
//onAuthenticationError is called when a fatal error has occurred. It provides the error code and error message as its parameters
public void onAuthenticationError(interrMsgId, CharSequenceerrString) {
//toast message will display the results of fingerprint authentication in case of an error
Toast.makeText(context, "Authentication error\n" + errString, Toast.LENGTH_LONG).show();
}
@Override
//will works when any of the fingerprint entered by the user doesn't match with the registered fingerprint
public void onAuthenticationFailed() {
Toast.makeText(context, "Authentication failed", Toast.LENGTH_LONG).show();
}
@Override
//onAuthenticationHelp is called when a non-fatal error has occurred. This method provides additional information about the error,
public void onAuthenticationHelp(inthelpMsgId, CharSequencehelpString) {
Toast.makeText(context, "Authentication help\n" + helpString, Toast.LENGTH_LONG).show();
}@Override
//when the user's fingerprint successfully match with the fingerprint registered on the device
public void onAuthenticationSucceeded(
FingerprintManager.AuthenticationResult result) {
Toast.makeText(context, " Authentication Successful!", Toast.LENGTH_LONG).show();
}
}
Application at Runtime