This service is free and uses an advanced risk assessment engine that helps prevent automated softwares from misusing your site. It is particularly helpful as it allows regular users to continue using the site with ease while simultaneously rooting out the miscreants. Recaptcha not only helps with protection but also provides datasets for machine learning, digitising texts etc. This is particularly helpful in the field of artificial intelligence as well as improving maps and preserving books.
![Android ReCAPTCHA]()
In the following tutorial, we'll learn about building a simple android app development india that uses button click to confirm that the interaction is being initiated by a human. The API used for the implementation of recaptcha is safety net API.
Acquiringare CAPTCHAKey Pair
Before using a recaptcha service in your application you’ll need two key pairs.Go to the https://g.co/recaptcha/androidsignupto register a key pair for use with the SafetyNetreCAPTCHA API.
Steps:
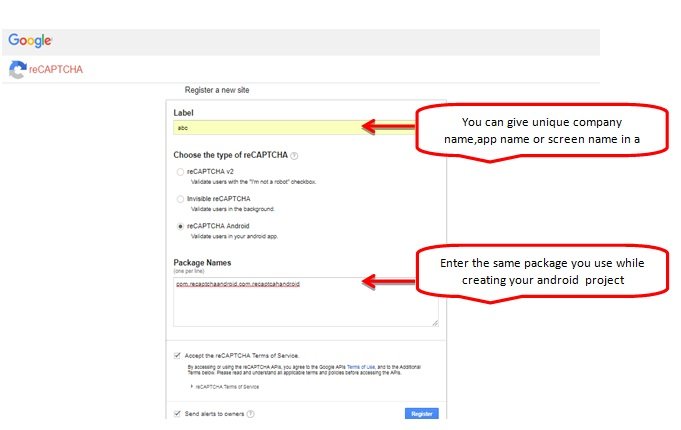
1. Enter a unique lable for your key .You can give your app name , screen name or a company/organization name in the given field.We have used abccompany name just to show you.
2. Select the type of reCAPTCHA from the options. For this you have to select reCAPTCHA android as shown in the image below.
3. Enter package name of your app in a given field.You can use the same reCAPTCHAAPI key for multiple android applications by providing the package name of each app that uses this API key.
![recaptcha]()
4. If you want to receive emails about the reCAPTCHA API, you can check the Send alerts to owners checkbox ,otherwise leave it.
5. Click the checkbox “Accept the reCAPTCHA Terms of Service” and click the register button.
6. After registration , you’ll get the Site key and Secret key that appears on the next page. Site Key that must be passed to the service from your Android app which will be used for sending the verification request and Secret key that must be passed to the service from your back-end server which will be used for validating the user response token.
![recaptcha]()
Project Setup
Steps
1. Create a new project in android studio from File->New Project-> and select the Basic Activity from layouts.While creating your project,make sure to use the package name you have registered on reCAPTCHA dashboard.
2. We need to add SafetyNETAPI dependency to our build.gradle(module level) file, as they are a part of Google play services.We are also using Volley dependency here to send HTTP call to our server to validate the captcha token(user response token) on the server side.
build.gradle
dependencies {
// SafetyNetreCAPTCHA
implementation 'com.google.android.gms:play-services-safetynet:11.8.0'
// Volley
implementation 'com.android.volley:volley:1.1.0'
implementation fileTree(dir: 'libs', include: ['*.jar'])
implementation 'com.android.support:appcompat-v7:26.1.0'
}
3. You can’t perform network-related operations without the internet permission, so add the following line to your project’s manifest file:
<uses-permissionandroid:name ="android.permission.INTERNET" />
4. Add the below code in a string.xml file of your project resources folder.
string.xml
<resources>
<string name="app_name">reCaptcahAndroid</string>
<string name="btnClick">Confirm not a robot</string>
<string name="confirmation">Confirmed you are not a robot</string>
</resources>
5. Make two layout files named as activity_main.xml and next_activity.xml from res/layout ,by right click on layout->
New->xml->layout xml File and add the below code in these xml files.
activity_main.xml
<?xml version="1.0" encoding="utf-8" ?>
<android.support.constraint.ConstraintLayoutxmlns:android ="http://schemas.android.com/apk/res/android"
xmlns:app="http://schemas.android.com/apk/res-auto"
xmlns:tools="http://schemas.android.com/tools"
android:layout_width="match_parent"
android:layout_height="match_parent"
tools:context=".MainActivity">
<Button android:id="@+id/button"
android:layout_width="wrap_content"
android:layout_height="wrap_content"
android:text="@string/btnClick"
tools:ignore="MissingConstraints" />
</android.support.constraint.ConstraintLayout>
main.xml
<?xml version="1.0" encoding="utf-8" ?>
<LinearLayoutxmlns:android ="http://schemas.android.com/apk/res/android"
android:layout_width="match_parent"
android:layout_height="match_parent">
<TextView android:id="@+id/textView"
android:layout_width="wrap_content"
android:layout_height="wrap_content"
android:layout_weight="1"
android:paddingLeft="15dp"
android:text="@string/confirmation"
android:textSize="25sp"
android:textStyle="bold" />
</LinearLayout>
</LinearLayoutxmlns:android>
</android.support.constraint.ConstraintLayoutxmlns:android>
6. Create a new class named Services.java and extend the class from Application. In this class, Volley singleton instances are created. This class would not be your Activity class.
Services.java
package com.recaptchaandroid.com.recaptcahandroid;
import android.app.Application;
import android.text.TextUtils;
import com.android.volley.Request;
import com.android.volley.RequestQueue;
import com.android.volley.toolbox.Volley;
public class Services extends Application {
public static final String TAG = Services.class
.getSimpleName();
private RequestQueuemRequestQueue;
private static Services mInstance;
@Override
public void onCreate() {
super.onCreate();
mInstance= this;
}
public static synchronized Services getInstance(MainActivitymainActivity) {
return mInstance;
}
public RequestQueuegetRequestQueue() {
if (mRequestQueue== null) {
mRequestQueue= Volley.newRequestQueue(getApplicationContext());
}
return mRequestQueue;
}
public <T>
void addToRequestQueue(Request<T>
req, String tag) {
// set the default tag if tag is empty
req.setTag(TextUtils.isEmpty(tag) ? TAG : tag);
getRequestQueue().add(req);
}
public <T>
void addToRequestQueue(Request<T>
req) {
req.setTag(TAG);
getRequestQueue().add(req);
}
public void cancelPendingRequests(Object tag) {
if (mRequestQueue!= null) {
mRequestQueue.cancelAll(tag);
}
}
}
</T>
</T>
</T>
</T>
7. In MainActivity.javaclass of your project,add the below code.
MainActivity.java
package com.recaptchaandroid.com.recaptcahandroid;
import android.content.Intent;
import android.support.annotation.NonNull;
import android.support.v7.app.AppCompatActivity;
import android.os.Bundle;
import android.util.Log;
import android.view.View;
import android.widget.Button;
import android.widget.Toast;
import org.json.JSONException;
import org.json.JSONObject;
import java.util.HashMap;
import java.util.Map;
import com.android.volley.Request;
import com.android.volley.Response;
import com.android.volley.VolleyError;
import com.android.volley.toolbox.StringRequest;
import com.google.android.gms.common.api.ApiException;
import com.google.android.gms.common.api.CommonStatusCodes;
import com.google.android.gms.safetynet.SafetyNet;
import com.google.android.gms.safetynet.SafetyNetApi;
import com.google.android.gms.tasks.OnFailureListener;
import com.google.android.gms.tasks.OnSuccessListener;
public class MainActivityextends AppCompatActivity {
String user_response_token;
private static final String TAG = MainActivity.class.getSimpleName();
// TODO - replace the SITE KEY with yours
private static final String SAFETY_NET_API_SITE_KEY = "6Ld8j1cUAAAAAO6nHV4p6-Yf9Q_Tc5tZw5_yfDfM";
// TODO - replace the SERVER URL with yours
private static final String URL_VERIFY_ON_SERVER = "https://www.google.com/recaptcha/api/siteverify ";
// TODO - replace the SECRET KEY with yours
private static final String SAFETY_NET_API_SECRET_KEY = "6Ld8j1cUAAAAAK_PEFKFYtXg00--rBtkQGz3YKFC ";
Button button;
@Override
protected void onCreate(Bundle savedInstanceState) {
super.onCreate(savedInstanceState);
setContentView(R.layout.activity_main);
button=findViewById(R.id.button);
button.setOnClickListener(new View.OnClickListener() {
@Override
public void onClick(View view) {
validateCaptcha();
}
});
}
private void validateCaptcha() {
{
// Showing reCAPTCHA dialog
SafetyNet.getClient(this).verifyWithRecaptcha(SAFETY_NET_API_SITE_KEY)
.addOnSuccessListener(this, new OnSuccessListener<SafetyNetApi.RecaptchaTokenResponse>
() {
@Override
public void onSuccess(SafetyNetApi.RecaptchaTokenResponse response) {
Log.d(TAG, "onSuccess");
//user_response_token is a variable which carries the user's input
user_response_token=response.getTokenResult();
if (!user_response_token.isEmpty()) { // check if the user input is not empty
Log.e("received","received");
// Received captcha token from user
// This token will further send to the server for validation using the SECRET key
tokenVerificationOnServer(user_response_token);
}
}
})
.addOnFailureListener(this, new OnFailureListener() {
@Override
public void onFailure(@NonNullException e) {
if (e instanceofApiException) {
ApiExceptionapiException = (ApiException) e;
Log.d(TAG, "Error message: " +
CommonStatusCodes.getStatusCodeString(apiException.getStatusCode()));
} else {
Log.d(TAG, "Unknown type of error: " + e.getMessage());
}
}
});
}
}
/**
* Verifying the received user captcha token on the server
* Post parameter: user_response
* Server makes call to https://www.google.com/recaptcha/api/siteverify URL to check the token
* with SECRET Key and Captcha token
*/
private void tokenVerificationOnServer(String user_response_token) {
StringRequeststrReq = new StringRequest(Request.Method.POST,
URL_VERIFY_ON_SERVER, new Response.Listener<String>
() {
@Override
public void onResponse(String response) {
Log.d(TAG, response.toString());
try {
JSONObjectjsonObject = new JSONObject(response);
booleansuccess = jsonObject.getBoolean("success");
if (success) {
Log.e("server no error","server no error");
// Congratulations! captcha verified successfully on server
//move to next screen using intents
Intent i=new Intent(MainActivity.this,Next_Activity.class);
startActivity(i);
finish();
} else {
Toast.makeText(getApplicationContext(), "Server error", Toast.LENGTH_LONG).show();
}
} catch (JSONException e) {
e.printStackTrace();
Toast.makeText(getApplicationContext(), "Json Error: " + e.getMessage(), Toast.LENGTH_LONG).show();
}
}
}, new Response.ErrorListener() {
@Override
public void onErrorResponse(VolleyError error) {
Log.e(TAG, "Error: " + error.getMessage());
}
}) {
@Override
protected Map<String, String=String>
getParams() {
Map<String, String=String>
params = new HashMap<>();
params.put("secret key",SAFETY_NET_API_SECRET_KEY);
params.put("user_response", MainActivity.this.user_response_token);
return params;
}
};
Services.getInstance(this).addToRequestQueue(strReq);
}
}
</String,>
</String,>
</String>
</SafetyNetApi.RecaptchaTokenResponse>
Replace SAFETY_NET_API_SITE_KEY and SAFETY_NET_API_SECRET_KEY valueswith your own SafetyNet Site key and Secret key that you get while registering for reCAPTCHA API using your own package name.
Replace URL_VERIFY_ON_SERVER value with https://www.google.com/recaptcha/api/siteverify. You can replace the url value with your own server url.
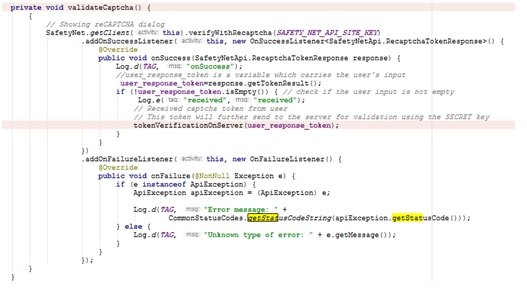
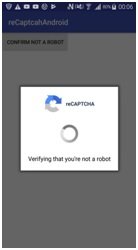
On button click ,the setOnClickListener() function will be called which will invoke the validateCaptcha() function inside it and shows the Captcha dialog to the user by calling verifyWithRecaptcha(SAFETY_NET_API_KEY) function.
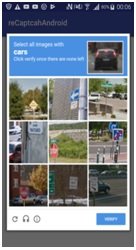
Once the verifyWithRecaptcha(SAFETY_NET_API_KEY)will be called , the user will gives the input according to the Captcha dialog.
When the reCAPTCHA API executes the onSuccess() method, the user has successfully completed the CAPTCHA challenge.
Upon receiving the user entered results from Captcha dialog , the User Response Token that needs to be sent to the server for validation.
response.getTokenResult() function will get the response entered by the user and saves it in a variable named as user_response_token.
Override the onSuccess() and onFailure() methods to handle both possible outcomes of the verification request task. In particular, if the API passes an instance of ApiException into onFailure(), you need to handle each possible status code that you can retrieve using getStatusCode().
user_response_token.isEmpty() method will check if user input is not empty , then this user_response_tokenwill be further send to the server for validation using the Secret Key by calling the function tokenVerificationOnServer()from android side.
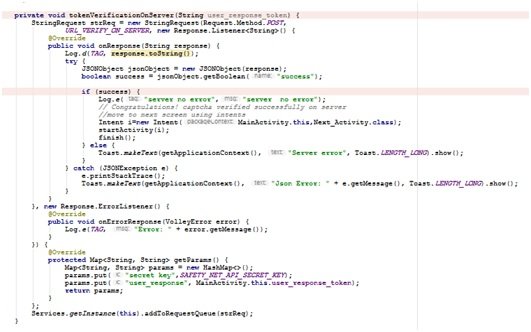
The server makes POST request to https://www.google.com/recaptcha/api/siteverify and validates the user response token.
Verification request code:
![recaptcha]()
Sending the user’s response to server for validation:
![recaptcha]()
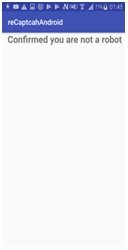
The server will send a JSON response with success status as the token is validated on server side. You need to take further action depending on success status. In this case, the next screen will be shown with the message “Confirmed you are not a robot”.
Next_Activity.java
packagecom.recaptchaandroid.com.recaptcahandroid;
import android.os.Bundle;
import android.support.v7.app.AppCompatActivity;
public class Next_Activityextends AppCompatActivity {
@Override
protected void onCreate(Bundle savedInstanceState) {
super.onCreate(savedInstanceState);
setContentView(R.layout.next_activity);
}
}
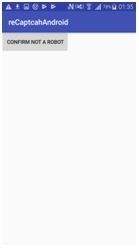
Running Application
![recaptcha]()
![recaptcha]()
![recaptcha]()
![recaptcha]()