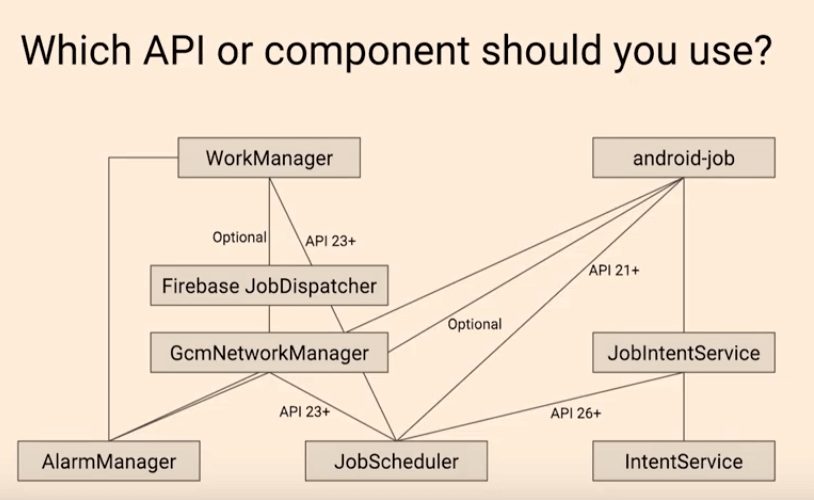
The Android team has been really putting a lot of efforts in the development of the Architecture Components and one of them is the WorkManager API. If you read the official docs they suggest, the WorkManager is used to do deferrable and asynchronous tasks.
WorkManager sits as a wrapper around the other existing APIs for background tasks. Under the hood it uses all these APIs so you don’t have to deal with them directly. With WorkManager many features were backported to API 14, and it kinds of automatically filters the best API for your requirement. Thereby providing features like delayed/instant work, periodic scheduling, wake-locks and efficient handling of background tasks.

If you are currently using JobScheduler and update it to WorkManager you will see how WorkManager is rock solid. JobScheduler was always flaky, occasionally your background process would stop for no apparent reason and you'd have to manually restart them.
Though the use of WorkManager mostly depends on the
The task your application is doing
The features and APIs you are specifically targeting
In long term one should definitely switch to the WorkManager, as Google is really putting a lot of effort in fixing the bugs from the existing frameworks and these are very critical changes.
Let’s dive into the implementation now!
Setup
Like any other library you need to add WorkManager’s dependency in your app level build.gradle file -
implementation "androidx.work:work-runtime:$work_version"
Note - You can check the docs for the latest version or if you are using Kotlin. Also include the ktx library if you are using Kotlin, for more concise and idiomatic Kotlin.
Creating a Worker Class
Creating a simple Worker class is very easy and you have to
- Extend your class by the worker class
- Override the onWork method
Also the standard straightforward constructor parameters are passed in. The second step is to override the doWork() method where our actual background processing takes place.
So here I have a CustomWorker class which is used to fire a notification and you can either use an OneTimeWorkRequest or PeriodicWorkRequest.
In the doWork function we are creating a simple notification that is triggered on any user driven action. Adding a tag to your worker is always recommended and is a best practice as it later helps you in finding and distinguishing your workers.
You can even process images to upload them to your server. We write the code inside try catch block to handle the exception if any. In case of an error you can log the exception message and return Result.failure() method. We don’t have only Result.success() and Result.failure() as return examples, but also a Result.retry() option which will retry your work again at a later time.
Scheduling the Work
Once your worker class is all done now you need to define when and how your work should run and here you will see the power of WorkManager.
Inside our MainActivity class, we create a Worker object and instantiate it. Finally we call the enque and that schedules our task.
As a part of work request you can add constraints, specify the input and choose the work to run once or periodically. You can find about all types of constraints in the docs. Also in this step, build the OneTimeWorkRequest using OneTimeWorkRequest.Builder(). Here we have passed in some constraints such that the request will run only when they are satisfied. For background processing or actually scheduling our task we enqueue() this WorkRequest which starts the process.
Updating the UI, Threading and More
The WorkManager worked well and your task is done but now you want to reflect that result. So what to do?
Luckily we can leverage another important aspect of WorkManager which is getWorkInfoByIdLiveData(). If you want to update the UI when the work finishes you can use this method which returns a WorkInfo live data. Since this is wrapped by live data it is observable and you can very well use it! WorkInfo generally contains the status of your work and outcome data.
WorkManager doesn’t offer you things like `setExact()` callback on your tasks as it focuses on the battery life and if your device is in Doze mode you shouldn’t wake it up unnecessarily. For setting a task with exact time you might still want to use the AlarmManager API.
Since we are handling deferrable tasks the WorkManager by default does the work off the main thread using an executor. (Though you can have your own custom threading logic implementation extending ListenableWorker)
Another key thing WorkManager offers is chaining of tasks. If you have many work tasks you can chain your works in order in which you want them to run. You can even pass the work requests as list which causes them to run in parallel.
Finally, you can also integrate your WorkManager with dependency injection libraries like Dagger to manage background tasks more efficiently through modular and scalable code structures, enhancing API integration services, which is an advance implementation in custom Android application development and for more information check the docs.


