Lint in Android and why it is important?


While developing Android applications on Android studio, we often get errors and red line on any functions or variable which is not correct. So to build an errorless android application we use some tools to avoid the wastage of time for compiling and running the code.
One of the best tools to write an errorless code is Lint. Lint is a scanning tool which helps the developers to identify the error and suggests the correct form related to the code error in the line. It helps the developer to build a smooth android application and forget about some silly mistakes that are taken while writing the code.
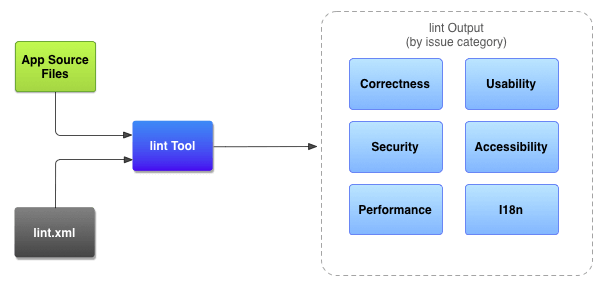
The above image is the architecture of the Lint and how it works.
As we can see that the complete process of linting is done in 3 main steps:
Step 1: Lint.xml file
This file is used to write checks for which you are comfortable. You can rewrite any check or ignore any checks. For example, suppose you want to check about the unused imports or code function in the codebase then you can do this using this file by rewriting it.
Step 2: App source file
This is used to select the file in which you want to check the about the lint. For example, MainActivity.java of your application has lots of unused code. So you can select this file for lint checking.
Step 3: Lint output/tool
Now , the lint tool tasks is to take the app source file and lint.xml file and checks for code errors and suggest some improvements in the code if required any. It is also a good step to use the lint suggestion before publishing our app on play store.
Why and when use Lint?
When you’re building the android applications and you want to publish the android application on play store then you need to remove all the unused imports, code functions and refactor the whole codebase. Refactoring helps you in decreasing the size of the android application apk which will be published on the play store. This can be done using Lint tool to remove the errors or warnings. Some of the warning you will always get before using lint are:
- Unused variables
- Unhanded exceptions
- Imports that are not used in the codebase.
Lint checking is done on all the levels of the project codebase. Below are the levels on which you can do the lint checking?
- Whole codebase
- Project module
- Android module
- Production module
- Test module
- Class hierarchy
- Version Control System.
How to configure lint?
So to use Lint tool in your project, you can add Lint inspection in the lint.xml file or you can manually select the issues to be handled by the lint tool in the project codebase by using Android Studio.
To do this job, add the list of issues to be configured in the lint.xml file. If you are making a new lint.xml file then make sure to put it into the root directory of your Android application development project.
Below is the example of the lint.xml file:
In this lint.xml file, you can see that we are ignoring the IconMissingDensityFolder, ObsoleteLayoutParam and many more. If you want to ignore any other functions then you can write here in this file.


