Using ML Kit in Android

It has been a little more than a year since Google announced that they are changing their core strategy from “Mobile First” to “AI first”. Since then a lot of focus in technology is shifted to Artificial Intelligence and quite visible efforts are being put in this area from all the dominant players of web — Google, Amazon and Facebook. As a result we are witnessing an advent of a lot of services, frameworks or platforms coming out for developers. The interest in Machine Learning and Deep learning has been increased by 50 times in last few years. Albeit an interesting fact is that Deep Learning or Machine Learning is not a new thing, it's there for a couple of decades but only now we have become capable of using and deploying ML in terms of computing and processing powers.
Birth of Tensor Flow aka ML for all:
Google invested a lot in this direction and integrated ML into many of their primary products, then they went ahead and put their efforts into public usage to help outside developers. Google released TensorFlow for developers to create, train and serve their custom ML models. Facebook has their very own PyTorch framework and Amazon is also providing ML and AI services via AWS. Machine Learning is a pretty vast and complex area and it is categorized as “doable but hard” as ML needs expertise in Maths, statistics and Data Science Course. Emerging startup can not always have good ML/AI talent in their small teams. To integrate ML into their app in quick fashion and to use ML in their use-cases, there are some ready made solutions built for them. TensorFlow Lite and ML Kit is one such solution. The focus of this article is ML Kit.
ML Kit
So what is ML Kit? As the name says it is a Machine Learning kit for developers and provides a lot of functionality including but not limited to image analysis. It all started from an offering from Google called “Google Vision” 2 years ago. Google Vision was an Image Analysis framework which aimed to help developers in detecting objects, faces and texts in a given image. Although Google Vision was a cloud hosted solution, there was a mobile peer also available with name “Mobile Vision” which was focused on Android app developers India to use the library for face detection, face landmark detection, barcode reading and text detection. Since the release of this library there are a lot of advancements in the field of ML and AI solutions. The new efforts gave birth to TensorFlow and also changed the mechanism of how images are analyzed. Mobile Vision was deprecated and replaced by ML Kit. So the objective of ML Kit is same as Mobile Vision but it is more advanced and capable of a lot more things in better way. ML Kit is available under Firebase suite of features. Firebase is being extensively used by Android/iOS developers for authentication, real-time database, analytics, crash reporting and AB testing.
Let’s explore ML Kit now
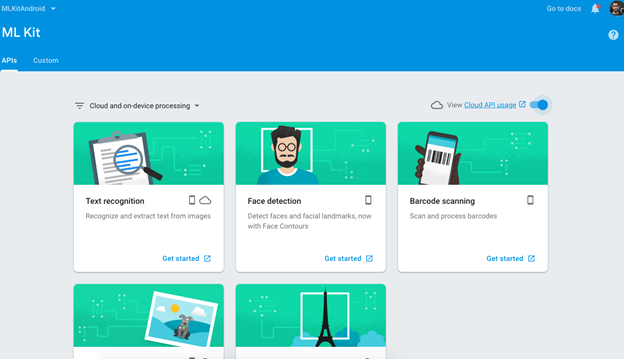
ML Kit provides following features out of the box:
- Text recognition
- Face detection
- Image labelling
- Barcode Scanning
- Recognising landmarks
As I mentioned earlier, it is hard to implement ML in apps from scratch, development teams may not have ML experts in team so ML kit resolves this issue. Using ML kit, developers can take advantage of these features without having to do anything from scratch. ML kit provides REST API’s to do the image recognition and above tasks. And also it is not limited to this. If developers want to go deeper and have enough understanding of how to create, train and deploy ML models they can use ML Kit to do that on Firebase server. There is also “TensorFlow Lite” version of TF models which are very light weight and give almost the same kind of accuracy.
On device ML execution
One more pretty interesting thing about ML Kit is that they have also focused on ‘on device’ ML execution. On device execution, using this we can do the image detection kind of things on the device without needing to contact the server. The ML framework will download the model on the device or you can ship it with your APK and it will execute using the given input and return the result. The obvious advantages here are low latency, no network need (offline) and no cost. It’s free. The downside here is that it may not be as accurate as the Cloud API but developers can choose any of this on the basis of their use case.
Integrating and using ML Kit in Android app
Since ML Kit is part of Firebase, first of all Firebase is needed to be setup in project. It can be done manually or using Android Studio Firebase Tool. If Firebase tool is not available in your Android Studio go to this link to read how to install the Tool. It is very helpful if you are setting up Firebase for the first time. I will quickly go through the steps of Firebase setup. You can also get the source of sample project from the github here.
- Create a new project in Android Studio
- Create a new Firebase project in Firebase Console (or use an existing one).
- Creating a Firebase project is free but some of the services are chargeable (including ML Kit cloud API’s) for this the basic plan is needed to be upgraded from Spark to Blaze but it is not a matter of concern as the Blaze plan is pay-as-you-go model and our ML experiment will fall under free quota. Still payment mode is needed to be setup.
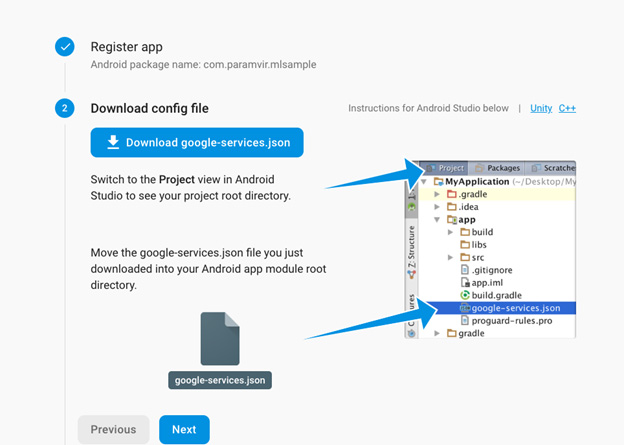
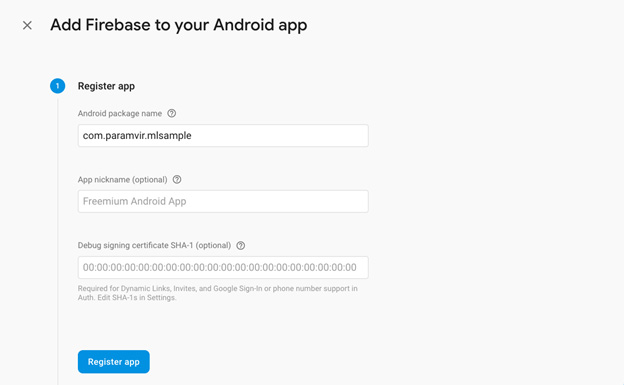
- Once a project is created, we need to fill our Android project info in the required fields in Firebase project as shown here. We need to add the project package and also download a config file google-services.json and place it into the root directory of our project. It will connect our app to the firebase project.
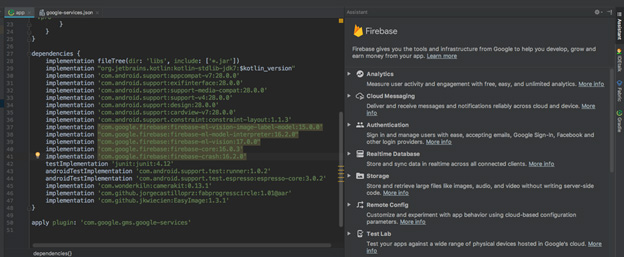
- Once connection is done we need to add a few dependencies in our Gradle file and after sync we are good to go. Go to ML Kit tab in Firebase dashboard.
- We need to ‘enable cloud API’ usage in order to start using cloud based API’s.
ML Kit for Firebase | Firebase
Use machine learning in your apps to solve real-world problems.firebase.google.com
Text Detection
We need to create a FirebaseVisionImage from the actual input image. The input image can be a bitmap.
Details: https://firebase.google.com/docs/ml-kit/android/recognize-text?authuser=0
Then we get a TextRecognizer object from FirebaseVision API. The visionImage object is passed to the recognizer and it returns the text extracted from the image.


