Getting started with Room in Android

Android SDK already provides us with the SQLite (comes included in Android SDK) and there is Firebase Real-time Database and Cloud Firestore as well so why Room?
From official documentation , Room can be thought of as a persistence library that provides an abstraction layer over SQLite. A database is an essential part of your application and as a developer, you would surely want to leverage the maximum of your app database be it local or remote. It offers endless solutions and especially if your app is `online`, you must use some sort of a database logic.
(Note that for following along it is recommended that you have at least programmed in SQL before.)
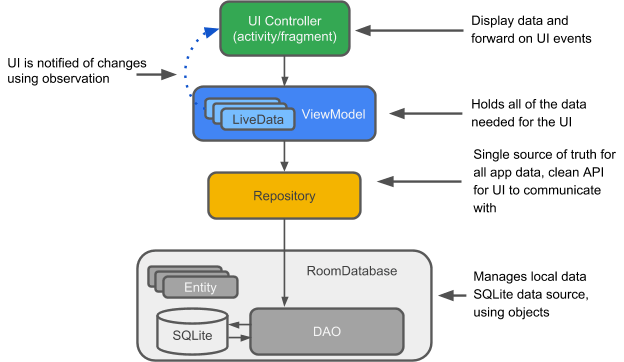
The above diagram illustrates your application's architecture and how to include Room with it. Since Room is also a part of Android Architecture Components, it blends well with your ViewModel and LiveData.
Room comprises of three core components -
Entities -
These are the tables that reside inside your database, and each table is represented by an entity.
Data Access Object -
This is the most important component as it enlists all the methods to perform actions on the Database. This class should either be an interface or be an abstract class.
Database -
This class serves as the setup point for our relational database. We use the @Database annotation and the class needs to be abstract and extend the RoomDatabase class. Later we will get the instance of this class.
We will create a sample project showing Room’s implementation -
Create a New Android Studio Project, naming it `RoomSample` with default configurations and enable support for AndroidX.
Adding Dependencies -
Since the project uses Jetpack components, add the following libraries in your app level build.gradle file -
(Check docs for the latest version)
The app is going to store a list of names, entered by the user in our Room Database and then display it in a RecyclerView.
Create a new Package called utils and add a data class, `Name` to it, with fields - Id and name
Our app will have only one table which will store all the names in it. So we annotate our Name class with @Entity and the table name is going to be `names`. Note that table names in SqLite are case sensitive.
We annotate the id field with @PrimaryKey since it is required to define one of your fields as a Primary Key.
Further we have the name column. You can think of these as attributes for a single name. So, every `name` has an id and a string value of name associated to it.
Add another class CustomAdapter to it which is required for our RecyclerView -
Also, following is the code for layout_list_item file -
A simple layout to show the name field in our RecyclerView
Next, create a new package called `persistence` and this will contain all the database logic of our application.
We will have two classes here, NameDatabase and NameDao.
-
NameDatabase -
This is an abstract class.
@Database(entities = Name.class, version = 1) public abstract class NameDatabaseextends RoomDatabase { public abstract NameDaonameDao(); private static volatile NameDatabasenameDatabaseInstance; public static NameDatabasegetInstance(final Context context){ if(nameDatabaseInstance== null){ synchronized(NameDatabase.class){ if(nameDatabaseInstance== null){ nameDatabaseInstance= Room.databaseBuilder(context.getApplicationContext(), NameDatabase.class, "name_database") .build(); } } } returnnameDatabaseInstance; } } We annotate this class with @Database annotation and specify the table name we are going to use, and the database version. Room automatically does versioning for your database implementation of which you can check in docs.
Since our app should have only one instance of the database use Singleton pattern to create its singleton object. Inside the getInstance(), we are using the Room.databaseBuilder() function to build our database with the name being, `name_database`.
-
NameDao
@Dao public interface NameDao { @Insert voidinsert(Name name); @Query("SELECT * FROM names") LiveData<List<Name>>getAllNames(); } In our Dao class we add the insert method, annotate it with the @Insert and we are good to go. Next we add a method of type LiveData(which will be used to update our ViewModel) and fetch all the names from our database. You can have other CRUD operations in this interface as well. Further, for querying different tables you should have other Daos.
Since we are using the Architecture components and this app is going to be life-cycle aware, create a new class CustomViewModel, extending the AndroidViewModel (subclass of ViewModel) -
public class CustomViewModelextends AndroidViewModel { privateNameDaonameDao; privateNameDatabasenameDB; privateLiveData<List<Name>>mNames; publicCustomViewModel(@NonNullApplication application) { super(application); nameDB= NameDatabase.getInstance(application); nameDao= nameDB.nameDao(); mNames= nameDao.getAllNames(); } publicLiveData<List<Name>>getNames() { returnmNames; } public void insert(Name name){ newInsertNameTask(nameDao).execute(name); } private class InsertNameTaskextends AsyncTask<Name, Void, Void>{ NameDaomNameDao; publicInsertNameTask(NameDaonameDao) { mNameDao= nameDao; } @Override protectedVoid doInBackground(Name... names) { nameDao.insert(names[0]); return null; } } } Here we have created the InsertNameTask so that we perform the insert operations in the background thread asynchronously. We create a LiveData object of list of news which gets populated through our Dao class, and then we have a wrapper function to return the live data.
Now we will create an editor activity where the user can enter the name input. Create a new class EnterNameActivity -
public class EnterNameActivityextends AppCompatActivity { public static final String NAME_ADDED = "new_name"; privateEditTextmEditText; @Override protected void onCreate(Bundle savedInstanceState) { super.onCreate(savedInstanceState); setContentView(R.layout.activity_new_name); mEditText= findViewById(R.id.enter_name); Button button = findViewById(R.id.btn_add); button.setOnClickListener(new View.OnClickListener() { @Override public void onClick(View view) { Intent intent = new Intent(); if(TextUtils.isEmpty(mEditText.getText())){ setResult(RESULT_CANCELED, intent); } else{ String name = mEditText.getText().toString(); intent.putExtra(NAME_ADDED, name); setResult(RESULT_OK, intent); } finish(); } }); } } The class is responsible to get data from the user through an EditText, and pass it with our result intent.
The corresponding layout is -
<?xml version="1.0" encoding="utf-8" ?> <LinearLayoutxmlns:android ="http://schemas.android.com/apk/res/android" xmlns:app="http://schemas.android.com/apk/res-auto" xmlns:tools="http://schemas.android.com/tools" android:layout_width="match_parent" android:orientation="vertical" android:layout_height="match_parent" tools:context=".EnterNameActivity"> <EditText android:inputType="text" android:layout_gravity="center" android:ems="10" android:hint="Enter a new name" android:layout_width="wrap_content" android:id="@+id/enter_name" android:layout_height="wrap_content" /> <Button android:text="Add" android:layout_gravity="center" android:id="@+id/btn_add" android:layout_width="wrap_content" android:layout_height="wrap_content" /> </LinearLayout> </LinearLayoutxmlns:android> Inside your MainActivity’s layout file, add a RecyclerView and a Floating Action Button -
<?xml version="1.0" encoding="utf-8" ?> <RelativeLayout xmlns:android="http://schemas.android.com/apk/res/android" xmlns:app="http://schemas.android.com/apk/res-auto" xmlns:tools="http://schemas.android.com/tools" android:layout_width="match_parent" android:layout_height="match_parent" tools:context=".MainActivity"> <androidx.recyclerview.widget.RecyclerView android:layout_width="match_parent" android:id="@+id/recyclerView" android:layout_height="match_parent" /> <com.google.android.material.floatingactionbutton.FloatingActionButton android:layout_width="wrap_content" android:layout_marginEnd="4dp" android:layout_marginBottom="4dp" android:layout_alignParentBottom="true" android:layout_alignParentEnd="true" android:src="@android:drawable/ic_input_add" android:id="@+id/add_fab" android:layout_height="wrap_content" /> </RelativeLayout> Now add the logic to display names in our RecyclerView -
public class MainActivityextends AppCompatActivity { private static final intREQUEST_CODE = 1; privateCustomViewModelmViewModel; privateCustomAdaptercustomAdapter; @Override protected void onCreate(Bundle savedInstanceState) { super.onCreate(savedInstanceState); setContentView(R.layout.activity_main); RecyclerViewrecyclerView = findViewById(R.id.recyclerView); customAdapter= new CustomAdapter(this); recyclerView.setAdapter(customAdapter); recyclerView.setLayoutManager(new LinearLayoutManager(this)); FloatingActionButtonactionButton = findViewById(R.id.add_fab); actionButton.setOnClickListener(new View.OnClickListener() { @Override public void onClick(View view) { Intent intent = new Intent(MainActivity.this, EnterNameActivity.class); startActivityForResult(intent, REQUEST_CODE); } }); mViewModel= ViewModelProviders.of(this).get(CustomViewModel.class); mViewModel.getNames().observe(this, new Observer<List<Name>>() { @Override public void onChanged(List<Name> names) { customAdapter.setNames(names); } }); } @Override protected void onActivityResult(intrequestCode, intresultCode, @NullableIntent data) { super.onActivityResult(requestCode, resultCode, data); if(requestCode == REQUEST_CODE &&resultCode == RESULT_OK){ finalString name_id = UUID.randomUUID().toString(); Name name = new Name(name_id, data.getStringExtra(EnterNameActivity.NAME_ADDED)); mViewModel.insert(name); Toast.makeText(this, "Name saved", Toast.LENGTH_SHORT).show(); } else{ Toast.makeText(this, "Name not saved", Toast.LENGTH_SHORT).show(); } } } Inside of our MainActivity we override the onActivityResult method to get the data from EnterNameActivity, and if the response is not null, we call the ViewModel’s insert method to add it to database. We also observe the viewmodel, and whenever there is a change, we notify our adapter.
Android App Developers India are all set to go, have successfully implemented Room and can run the app now. If you want to view your database then, you can use the Database Browser for SqLite.
Read More: -


